Create a free Stripe account at stripe.com
To complete the following steps, ensure that "test mode" in Stripe is enabled.
Step 1: Configure webhooks
Stripe webhooks are used to sync data from Stripe to your Supabase database. To configure Stripe webhooks follow these steps.
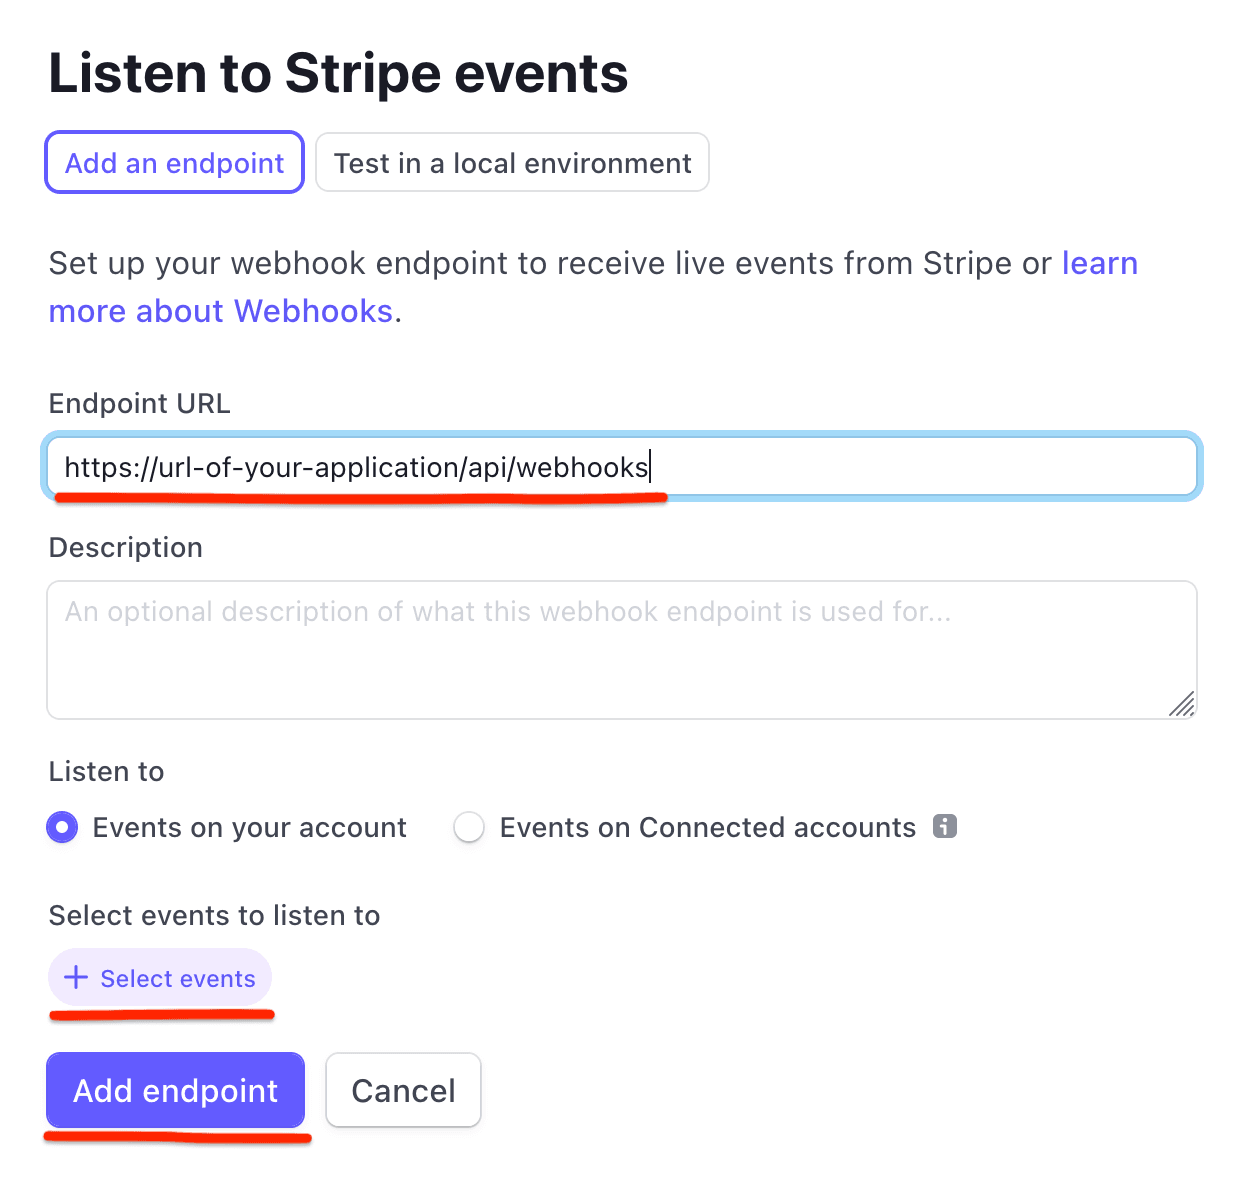
Create a new endpoint on the Stripe Test endpoints page.

Set the endpoint URL to the URL of your application - e.g. https://url-of-your-application/api/webhooks.
If this URL is not yet known, use any placeholder URL for now.

Select the events that you want to receive. The events handled by this app are:
product.createdproduct.updatedproduct.deletedprice.createdprice.updatedprice.deletedcheckout.session.completedcustomer.updatedcustomer.deletedcustomer.subscription.createdcustomer.subscription.updatedcustomer.subscription.deleted
Finally, copy the Signing secret for the webhook - it is needed in the next step.

Step 2: Set environment variables
To securely interact with Stripe, add the following environment variables for your application:
-
For local environment
NEXT_PUBLIC_STRIPE_PUBLISHABLE_KEYSTRIPE_SECRET_KEYSTRIPE_WEBHOOK_SECRET
-
For deployed applications
NEXT_PUBLIC_STRIPE_PUBLISHABLE_KEY_LIVESTRIPE_SECRET_KEY_LIVESTRIPE_WEBHOOK_SECRET_LIVE
-
For both local and deployed applications (these settings will depend on your pricing structure)
NEXT_PUBLIC_PRICE_BASIC_MONTHLYNEXT_PUBLIC_PRICE_BASIC_YEARLYNEXT_PUBLIC_PRICE_PRO_MONTHLYNEXT_PUBLIC_PRICE_PRO_YEARLYNEXT_PUBLIC_PRICE_MASTER_MONTHLYNEXT_PUBLIC_PRICE_MASTER_YEARLY
The first two keys can be found on the API keys page in Stripe. The STRIPE_WEBHOOK_SECRET or STRIPE_WEBHOOK_SECRET_LIVE value is the webhook Signing secret you copied in the previous step.

Step 3: Test webhooks
* Remember to update your webhook with the correct URL if you haven't done it in the previous step.
To ensure that the webhooks work with your deployed application, send a product.created test event from your Stripe test dashboard by clicking the Send test event button. If everything is configured correctly, a test product will be created in your Supabase database.
If the configuration is working, delete the test products created via the webhook from your database.
To test Stripe webhooks on your PC, see this detailed guide about testing Stripe webhooks locally.
Step 4: Create product and pricing information
Create your products with prices in your Stripe Dashboard. When you create or update your product and price information, the changes will automatically be synced to your Supabase database.
For example, this boilerplate has been set up to support 3 different products with 2 different prices (monthly/yearly) each.
E.g.:
- Product 1: Basic
- Price 1: 19.99 USD per month
- Price 2: 199.99 USD per year
- Product 2: Professional
- Price 1: 24.99 USD per month
- Price 2: 249.99 USD per year
- Product 3: Master
- Price 1: 39.99 USD per month
- Price 2: 399.99 USD per year
Set this up according to your business model and pricing structure.
Once you have configured your products and prices, add the price ID environment variables:
NEXT_PUBLIC_PRICE_BASIC_MONTHLYNEXT_PUBLIC_PRICE_BASIC_YEARLYNEXT_PUBLIC_PRICE_PRO_MONTHLYNEXT_PUBLIC_PRICE_PRO_YEARLYNEXT_PUBLIC_PRICE_MASTER_MONTHLYNEXT_PUBLIC_PRICE_MASTER_YEARLY
Step 5: Configure your Stripe customer portal
- Set your business branding and identity in the Stripe settings
- Configure your Customer Portal settings
- Toggle on "Allow customers to update their payment methods"
- Toggle on "Allow customers to update subscriptions"
- Toggle on "Allow customers to cancel subscriptions"
- Set up the required business information and links (e.g. terms and conditions, usage policy, etc.)