- Published on
- Published:
- Reading time
- 7 min read
Get started with Next.js and Supabase - Part 4
- Authors

- Name
- Nico Botha
- @nwbotha
This is the fourth blog post in a series of blog posts about getting started with Next.js and Supabase. It is recommended to read the first, second, and third post before reading this post.
What is Next.js?
Next.js is an open source React framework that makes statically and server-side rendered pages possible in your app. Where traditional React apps are rendered entirely in the browser, Next.js makes it possible to render pages server-side. This improves page speed and reduces bundle size significantly. You can read more about this powerful framework here.
What is Supabase?
Supabase is an open source Firebase alternative. With a PostgreSQL database, various authentication options, object storage, and cloud functions (coming soon) it is the easiest "backend-as-a-service" to get started with when building a SaaS. You can read more about this popular platform here.
What is Supabase file storage?
Supabase file storage is a scalable object store that supports any file type. It allows you to set custom policies and permissions to control access to your files. Files can be uploaded and managed using the Supabase API or the Supabase user interface.
How to use file storage in a Next.js app
Step 1: Create a storage bucket
For this blog post, we will reuse the same demo repository used for the previous blog posts and add functionality to upload and retrieve an image for a bike.
First, we have to create a storage bucket for the bike images. A storage bucket and security policies can be created on Supabase by either running a SQL script or through the user interface. To perform the storage bucket and policy creation at once we'll use a SQL script to perform the actions.
Navigate to the SQL editor page of your Supabase project (https://app.supabase.io/project/{project_id}/sql), click the "+ New query" button in the top left corner, and run the following script:
-- Create storage bucket
insert into storage.buckets (id, name)
values ('bike_images', 'bike_images');

-- Create bucket policies
-- Policy that allows any authenticated user to view all bike images
create policy "Any authenticated user can view bike images"
  on storage.objects for select
  using ( bucket_id = 'bike_images' );

-- Policy that allows the user that creates a bike to upload an image for the bike
create policy "User can upload their own bike image"
  on storage.objects for insert
  with check (
    bucket_id = 'bike_images'
    and auth.uid() = owner
  );

-- Policy that allows the user that first uploaded an image (owner) to update the image
create policy "User can update their own bike image"
  on storage.objects for update
  using (
    bucket_id = 'bike_images'
    and auth.uid() = owner
  );
By running the above script a storage bucket, called bike_images, will be created with the required security policies to create, update and view images. The first policy allows any authenticated user to view all bike images (whether they are the owner or not). To make images completely public (to allow unauthenticated users to view it as well) the bucket itself needs to be public.
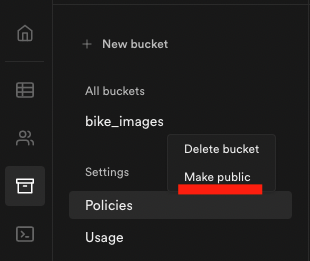
This can be changed on the Supabase user interface. To make a bucket public navigate to the "Storage" page of your Supabase project (https://app.supabase.io/project/{project_id}/storage/buckets):
- Click the 3 vertical dots next to the name of your bucket
- Then click the "Make public" option on the dropdown menu
NOTE: Security policies will still apply despite a bucket being public.
Step 2: Upload images to the bucket
Now it's time to add the code to upload a bike image when adding or editing the bike data. To store the file path for a bike add an extra database column, called file_path, to the bikes table. This can be done by running the following SQL script:
ALTER TABLE bikes ADD COLUMN file_path TEXT NULL
Once the file_path column is added the bike-form.js component and the new.js and edit.js pages can be updated to handle the file upload.
The code required to upload a file to file storage looks like this:
const imageFile = evt.target.files[0]
const imagePath = `public/${imageFile.name}`
supabase.storage
  .from('bike_images') // bucket name
  .upload(imagePath, imageFile, { upsert: true })
  .then((response) => {
    setBikeImagePath(imagePath)
  })
  .catch((error) => {
    // TODO: show error message popup
  })
When saving the bike the imagePath will be saved in the file_path column.
Step 3: Display image on bike page
The final step is to download and display the bike image when necessary. If your bucket is not public you need to create a signed URL to load an image in the browser. This can be done with the following code:
supabase.storage
  .from('bike_images') // bucket name
  .createSignedUrl(
    bike.file_path, // path to the image in the bucket
    36000 // time that the URL is valid in seconds
  )
  .then((data) => {
    if (data.error) {
      // TODO: Handle error
    }

    setSignedUrl(data.signedURL)
  })
If your bucket is public you can get the public URL for an image like this:
supabase.storage
  .from('bike_images') // bucket name
  .getPublicUrl(bike.file_path).publicURL // path to the image in the bucket
It's as simple as that. Uploading, deleting and loading files using Supabase storage is incredibly easy. To view the code of the entire demo app check out this repository. If you want to learn more about Supabase you can check out the official Supabase docs.