- Published on
- Published:
- Reading time
- 15 min read
Building Real-time Web Apps with Next.js and Supabase: A Comprehensive Guide
- Authors

- Name
- Nico Botha
- @nwbotha
We live in a world where knowledge is the most precious thing. But what is knowledge? Knowledge is information that is useful to you. It can be about anything, from the weather to the stock market. But information is only of value if it is acknowledged on time. If information is outdated, it is no longer an asset.
The term "new information" has distinct meanings in different sectors. It's frequently about seconds or minutes in the trading industry, for example. In some businesses, knowledge is valuable even if it is a few days or weeks old.
Yet, the sooner you become aware of it, the better. As a result, developers and engineers are continually devising new methods of providing information in a faster, more exact, and more secure manner.
That’s where Supabase’s real-time feature comes in handy. If you’re not familiar with Supabase and NextJS, you can read our series of 4 articles on how to build an app using NextJS and Supabase.
NOTE: This article assumes that you have some basic knowledge about NextJS and Supabase. If you don’t please read the aforementioned articles.
Initial setup
First, you need to set up the NextJS project. At the moment of writing this article using the /app directory is optional. Make sure you choose it while creating the NextJS project. You can create a new NextJS project by using the following command:
npx create-next-app nextjs-realtime-app
After that, we need to install the Supabase Javascript package with the following command:
npm install @supabase/supabase-js
Then we need to create a new database in Supabase and create a new table.
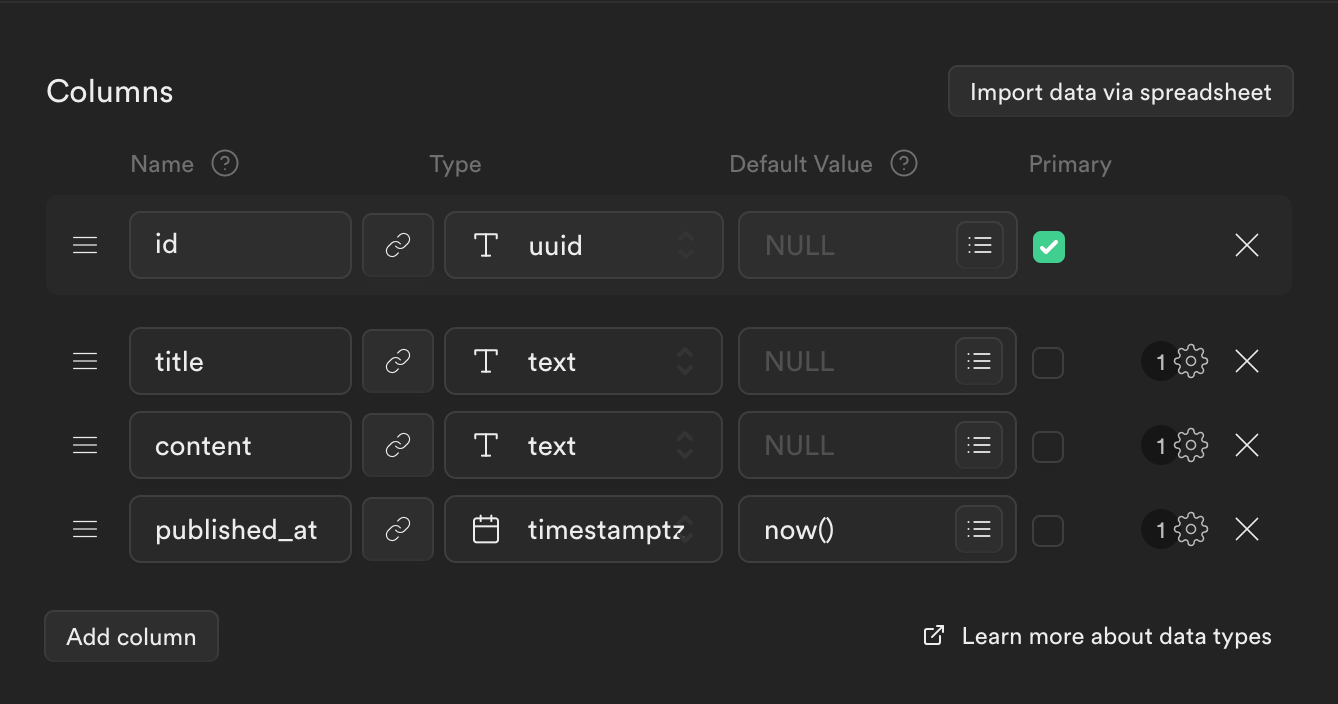
For the sake of this article, we’re going to create a posts table that will contain the following columns:
idwith typeuuidand with the default value ofuuid_generate_v4()titlewith typetextcontentwith typetextpublished_atwith typetimestamptzand with the default value ofnow()
For real-time data to function, we need to complete one more step. In the left sidebar click on Database, then click on Replication. After that click on the button, within a table, where it says 0 tables.

Once you click that you’ll see another screen. Make sure to click on the toggle next to the posts table, like in the image below:

This step is critical; else, real-time functionality would not function. The reason for this is that Supabase will be unaware of the table you wish to monitor for changes.
Another important step of this process is to copy the project URL and anon key from your project’s API settings and paste it into your local .env file, within the project.
Now that you have done the preparation, you can proceed to the next step.
Rendering posts
Our goal is to render posts from the database, on our home page, as they’re inserted into the database without refreshing the entire page.
1. Create a Supabase helper function
The first thing we want to do is to create a Supabase client helper function. Open your project and within the app/ directory create a new file called supabase.js. Once you do that, paste the following code into it:
import { createClient } from "@supabase/supabase-js";

export default createClient(
  process.env.NEXT_PUBLIC_SUPABASE_URL,
  process.env.NEXT_PUBLIC_SUPABASE_KEY,
);
NOTE: This piece of code assumes that you pasted the Supabase URL and anon key into the .env file within your project
2. Create a home page
Now, open page.js in your app/ folder and paste the following code:
import supabase from "./supabase";
import Posts from './posts';

export const revalidate = 0;

export default async function HomePage() {
  const {data} = await supabase.from('posts').select('*');
  return <Posts initialPosts={data ?? []} />
}
Let’s explain the above code:
The first line imports the Supabase helper function we created in the first step. The second line imports the Posts component that we’re yet to create.
After that, we’re adding the revalidate NextJS route config segment with the value of 0 - this ensures that a layout or page is always dynamically rendered even if no dynamic functions or dynamic data fetches are discovered.
This option changes the default of fetch requests that do not set a cache option to no-store but leaves fetch requests that opt into force-cache or use a positive revalidate as is.
Then, we’re creating our component HomePage that will show our rendered posts. The reason we’ve separated Posts from HomePage is that HomePage is a server-side rendered component while Posts will depend on some client-side functionality like useEffect.
The Posts component is expecting the initialPosts prop to render the initial set of posts. If data is empty then it will pass an empty array, []. This will help you avoid errors in the beginning.
3. Create Posts component
This component will render both initial posts and real-time added posts without reloading. To do that create a new file called posts.js in the root of your app/ folder and paste the following code there:
"use client";
import Link from "next/link";
import { useEffect, useState } from "react";
import supabase from "./supabase";

export default function Posts({ initialPosts }) {
 const [posts, setPosts] = useState(initialPosts);
 useEffect(() => {
  supabase
   .channel("posts")
   .on(
    "postgres_changes",
    {
     event: "INSERT",
     schema: "public",
     table: "posts",
    },
    (payload) => {
     setPosts((posts) => [payload.new, ...posts]);
    }
   )
   .subscribe();

  return () => {
   supabase.removeChannel("posts");
  };
 }, [supabase, posts, initialPosts]);
 return (
  <div>
   {posts.map((post) => (
    <Link key={post.id} href={`/${post.id}`}>
     <h1>{post.title}</h1>
     <p>{post.content}</p>
    </Link>
   ))}
  </div>
 );
}
The first line tells NextJS that this component is dependent on some client-side functionalities like useEffect().
After that, we’re importing the built-in Link component, useEffect() and useState() hooks from React, plus the supabase helper function.
Then, we’re initializing the state with initialPosts as our default state. This means that when the page loads, this component will render any posts passed by our initial request made in page.js.
Next, we’re using the useEffect() hook to listen for any changes in our database.
Let’s analyze our subscription to real-time data with Supabase. supabase.channel("posts") creates a subscription to the channel named “posts”. You can use any name you want here.
.on('postgres_changes' tells Supabase what type of subscription we’re creating, meaning that when something changes in Postgres an event will be triggered. In the next steps, we will specify the exact events we are interested in.
This is important, and you have to use this exact phrasing: postgres_changes, otherwise it won’t work.
on() method accepts another parameter, which is options (you can read more about it here). In options, you can specify more details like event, schema, table, etc.
We specified { event: "INSERT", schema: "public", table: "posts" } which means: whenever there is an “INSERT” event on our table “posts” in the “public” schema, notify my application. You can specify other events, schemas, and tables too.
The third parameter that on() method accepts is a callback function that will be called whenever a change happens in the specified table. It automatically passes the payload parameter.
(payload) => { setPosts((posts) => [payload.new, ...posts]);} means that we are changing our state with the new post(s) that were inserted in our database.
We chose to first insert new posts, then show the rest of the posts, hence [payload.new, ...posts]. If you want to show your new posts as the last you can do it like this [...posts, payload.new].
The payload object contains many properties, but the new value contains the data that has been inserted into the database.
Then, we subscribe to the channel using the keyword subscribe().
In the return statement, we’re unsubscribing from the channel to make our app more performant. Supabase automatically unsubscribes after 30 seconds, but if you are subscribed to many channels it can lead to performance loss.
Plus, this will save you some resources in the cloud. Read more about unsubscribing here.
The useEffect() hook has three dependencies supabase, posts, and initialPosts. Meaning that if any of those changes your posts will re-render.
And the last step is to just render our posts.
At this point, your app should render all of your posts from the database and any new posts that you add to the database.
4. Render a single post
Now that we have rendered all of our posts, we should render a single post when the user clicks on one.
To do that, we’re going to create a new component. In the root of the app/ folder create a new file called post.js. Within that file paste the following code:
"use client";
import { useEffect, useState } from "react";
import supabase from "./supabase";

export default function Post({ initialPost }) {
 const [post, setPost] = useState(initialPost);
 useEffect(() => {
  supabase
   .channel("post")
   .on(
    "postgres_changes",
    {
     event: "UPDATE",
     schema: "public",
     table: "posts",
     filter: `id=eq.${post.id}`,
    },
    (payload) => {
     setPost((post) => payload.new);
    }
   )
   .subscribe();

  return () => {
   supabase.removeChannel("post");
  };
 }, [supabase, post, initialPost]);
 return (
  <div>
   <h1>{post.title}</h1>
   <p>{post.content}</p>
  </div>
 );
}
This component accepts one prop which is initialPost. This prop will hold initial data for the post. Once we load this component it will listen for the changes on this very post it received via props.
In case some changes happen, they will be automatically visible.
There are fewer changes in the Post component compared to the Posts component.
The first one is that in the state, instead of using an array, we’re just passing a single object, because we’re working with only one post at a time.
The second change is that we have added a filter property to the options object that we’re passing to Supabase. filter makes sure that we’re listening to changes on a single row, instead of the entire table. We achieved that by using id=eq.${post.id}, where id is equal to the id of the current post.
The next change is in the render function, which renders the post title and post content.
But how do we get that post you may ask yourself. Here is how.
In the root of your app/ folder create a new folder called [id]. The reason we’re using this type of naming is because that’s how NextJS works with dynamic routes.
Inside the [id] folder create a new file called page.js. This file will get our post from Supabase and pass it as a prop to our Post component.
Next, open page.js and paste the following code inside of it:
import supabase from "../supabase";
import { notFound } from "next/navigation";
import Post from "../post";

export const revalidate = 0;

export default async function SinglePost({ params }) {
 const { id } = params;
 const { data } = await supabase
  .from("posts")
  .select("*")
  .match({ id })
  .single();
 if (!data) {
  return notFound();
 }

 return <Post initialPost={data} />;
}
Here, we’re calling our standard supabase helper function to connect to Supabase. Next, we’re using the notFound function that is provided by NextJS next/navigation package.
After that, we’re calling our Post component so we can render whatever we get from Supabase.
Again, we’re adjusting caching in NextJS for our use case with the revalidate variable.
Our SinglePost component has to be async because it needs results from Supabase to render everything properly.
params are part of the props that we’re expecting (you can read more about the NextJS app directory here). The params object contains your id from the URL.
Then, we’re fetching data from Supabase based on that id.
In case Supabase returns nothing, a user will see a 404 not found page. Otherwise, it will render your Post component.
To test these real-time updates, add new posts and update existing posts via the Supabase dashboard. You should see the changes reflected in your app without reloading.
Conclusion
Supabase has made it super easy to have access to real-time data. When you add NextJS simplicity to it, it works like a charm.
Having a real-time feature added to your app can be of great benefit and an awesome selling point.
For the complete code, you can check out this GitHub repository.
If you want to work super fast and bring those features even faster to your customers, you can check out our SaaS templates to get you set up in minutes.