- Published on
- Published:
- Reading time
- 16 min read
Deploying Your Next.js App to Google Cloud: A Step-by-Step Guide
- Authors

- Name
- Nico Botha
- @nwbotha
Next.js is one of the favorite React.js frameworks among JavaScript developers. The reason behind this is that it has the power of React.js, but it can also be used to build statically rendered apps that are easily indexed by search engines.
Another significant upside of Next.js is that it helps developers to create apps and websites faster because it handles many out-of-the-box processes like routing, optimization, static site generation, automatic code splitting, etc.
Google Cloud is a cloud computing platform that provides various services, including virtual machines, databases, storage, and more. It offers an easy-to-use interface and flexible pricing plans, making it a popular choice among developers.
There are at least two ways in which you can deploy your Next.js app on Google Cloud:
- Deploying your app on Google App Engine
- Deploying your app on the Firebase Platform using Cloud Functions with Firebase Hosting
The first one requires a little bit more knowledge and tweaking, as well as knowledge of Google Cloud.
The second one is 100% beginner-friendly and doesn’t require much except a few installation steps.
That’s why we’re going to cover the second approach in this article, and the first one will come later. The article about deploying the Next.js app to Google App Engine will be much longer and more advanced.
What is Firebase?
Firebase is a mobile and online application development platform that offers developers a wide range of tools and services for developing, testing, and deploying applications.
It was acquired by Google in 2014 and provides a real-time database, cloud storage, authentication, hosting, and analytics tools to assist developers in creating high-quality apps.
Firebase is well-known for its ease of use and minimal setup, enabling developers to start building applications immediately without worrying about complex configurations.
It offers various APIs and SDKs for multiple platforms, including Android, iOS, and the web, making it simple to integrate Firebase services into applications.
Firebase also offers real-time data synchronization, which is useful for building collaborative applications such as chat applications and real-time gaming.
Moreover, Firebase provides a variety of analytics tools to help developers track user behavior, identify trends, and improve their applications.
These tools provide insights into user engagement, retention, and revenue, assisting developers in making informed decisions about their application development and marketing strategies.
Firebase is a robust platform that offers developers a range of tools and services to help them build high-quality applications quickly and easily, making it an excellent choice for developers of all skill levels.
Difference between ReactJS and NextJS
The main difference between ReactJS and NextJS in this situation is that NextJS requires a server to handle some tasks, like server-side rendering, whereas ReactJS relies entirely on users and their machines.
When you deploy a ReactJS app to Firebase hosting, Firebase acts as a CDN, providing fast and reliable access to your app for both you and your users.
This is possible because the ReactJS app is built and prepared before deployment during build time.
However, NextJS apps typically require server-side rendering, which Firebase hosting is not capable of providing. Therefore, you need to use another Firebase service - Firebase Cloud Functions.
In this article, we will cover two cases:
- Deploying a static NextJS app
- Deploying a dynamic NextJS app
Deploy NextJS app to Firebase
To deploy an app to Firebase cloud functions, we have to take several steps:
- Create a Next.js app
- Register with Firebase
- Install the necessary dependencies
- Set up the Firebase project locally
- Configuration
- Deploy the app
Let's start with the first step on our list.
1. Create a NextJS app
We have already discussed this step in some of our previous articles, such as in this one Authorization and Authentication with Next.js and Supabase (Supabase is an open-source Firebase alternative).
In summary, to create a new NextJS app, you need to run this command:
npx create-next-app firebase-app
npx is NodeJS command-line tool. create-next-app is a command used to create a new Next.js application. firebase-app is the name of the directory (within the current directory) where the NextJS app will be installed.
Once this command finishes you can open your code and do the following change in your pages/index.js file.
export default function Home(props) {
 return (
  <h1>Hello, world</h1>
 );
}
Remove everything else and just paste the above code. This code will “test” if SSR works during deployment.
2. Register to Firebase
Simply visit https://console.firebase.google.com and use your Gmail account to log in.
Once you do that, you’ll be forwarded to the starting page of Firebase Console.
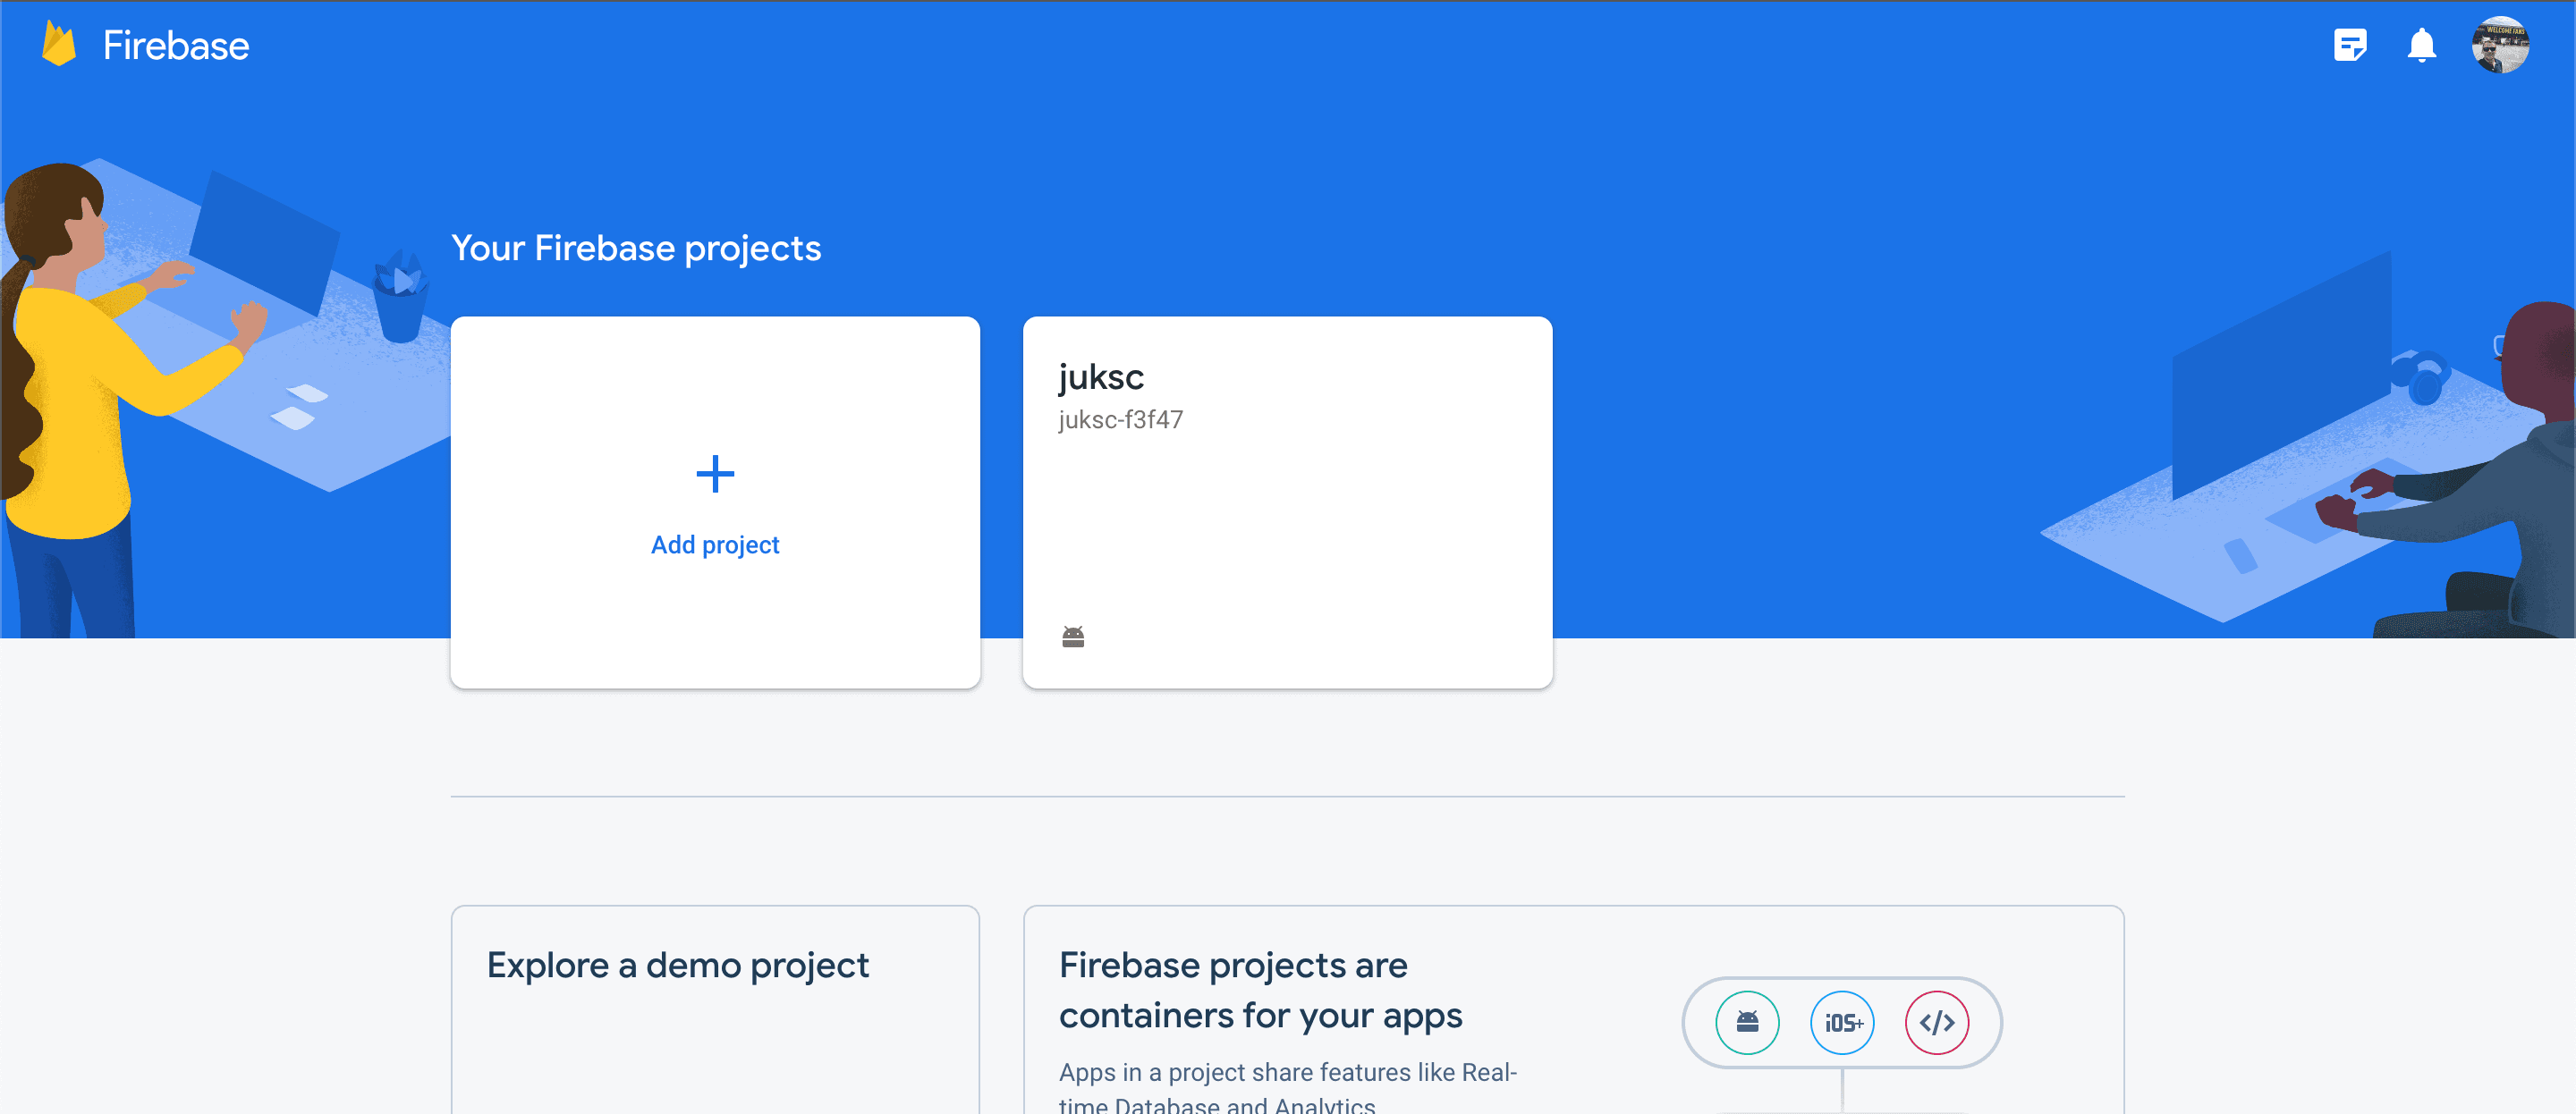
Then, click the "Create a project" button.
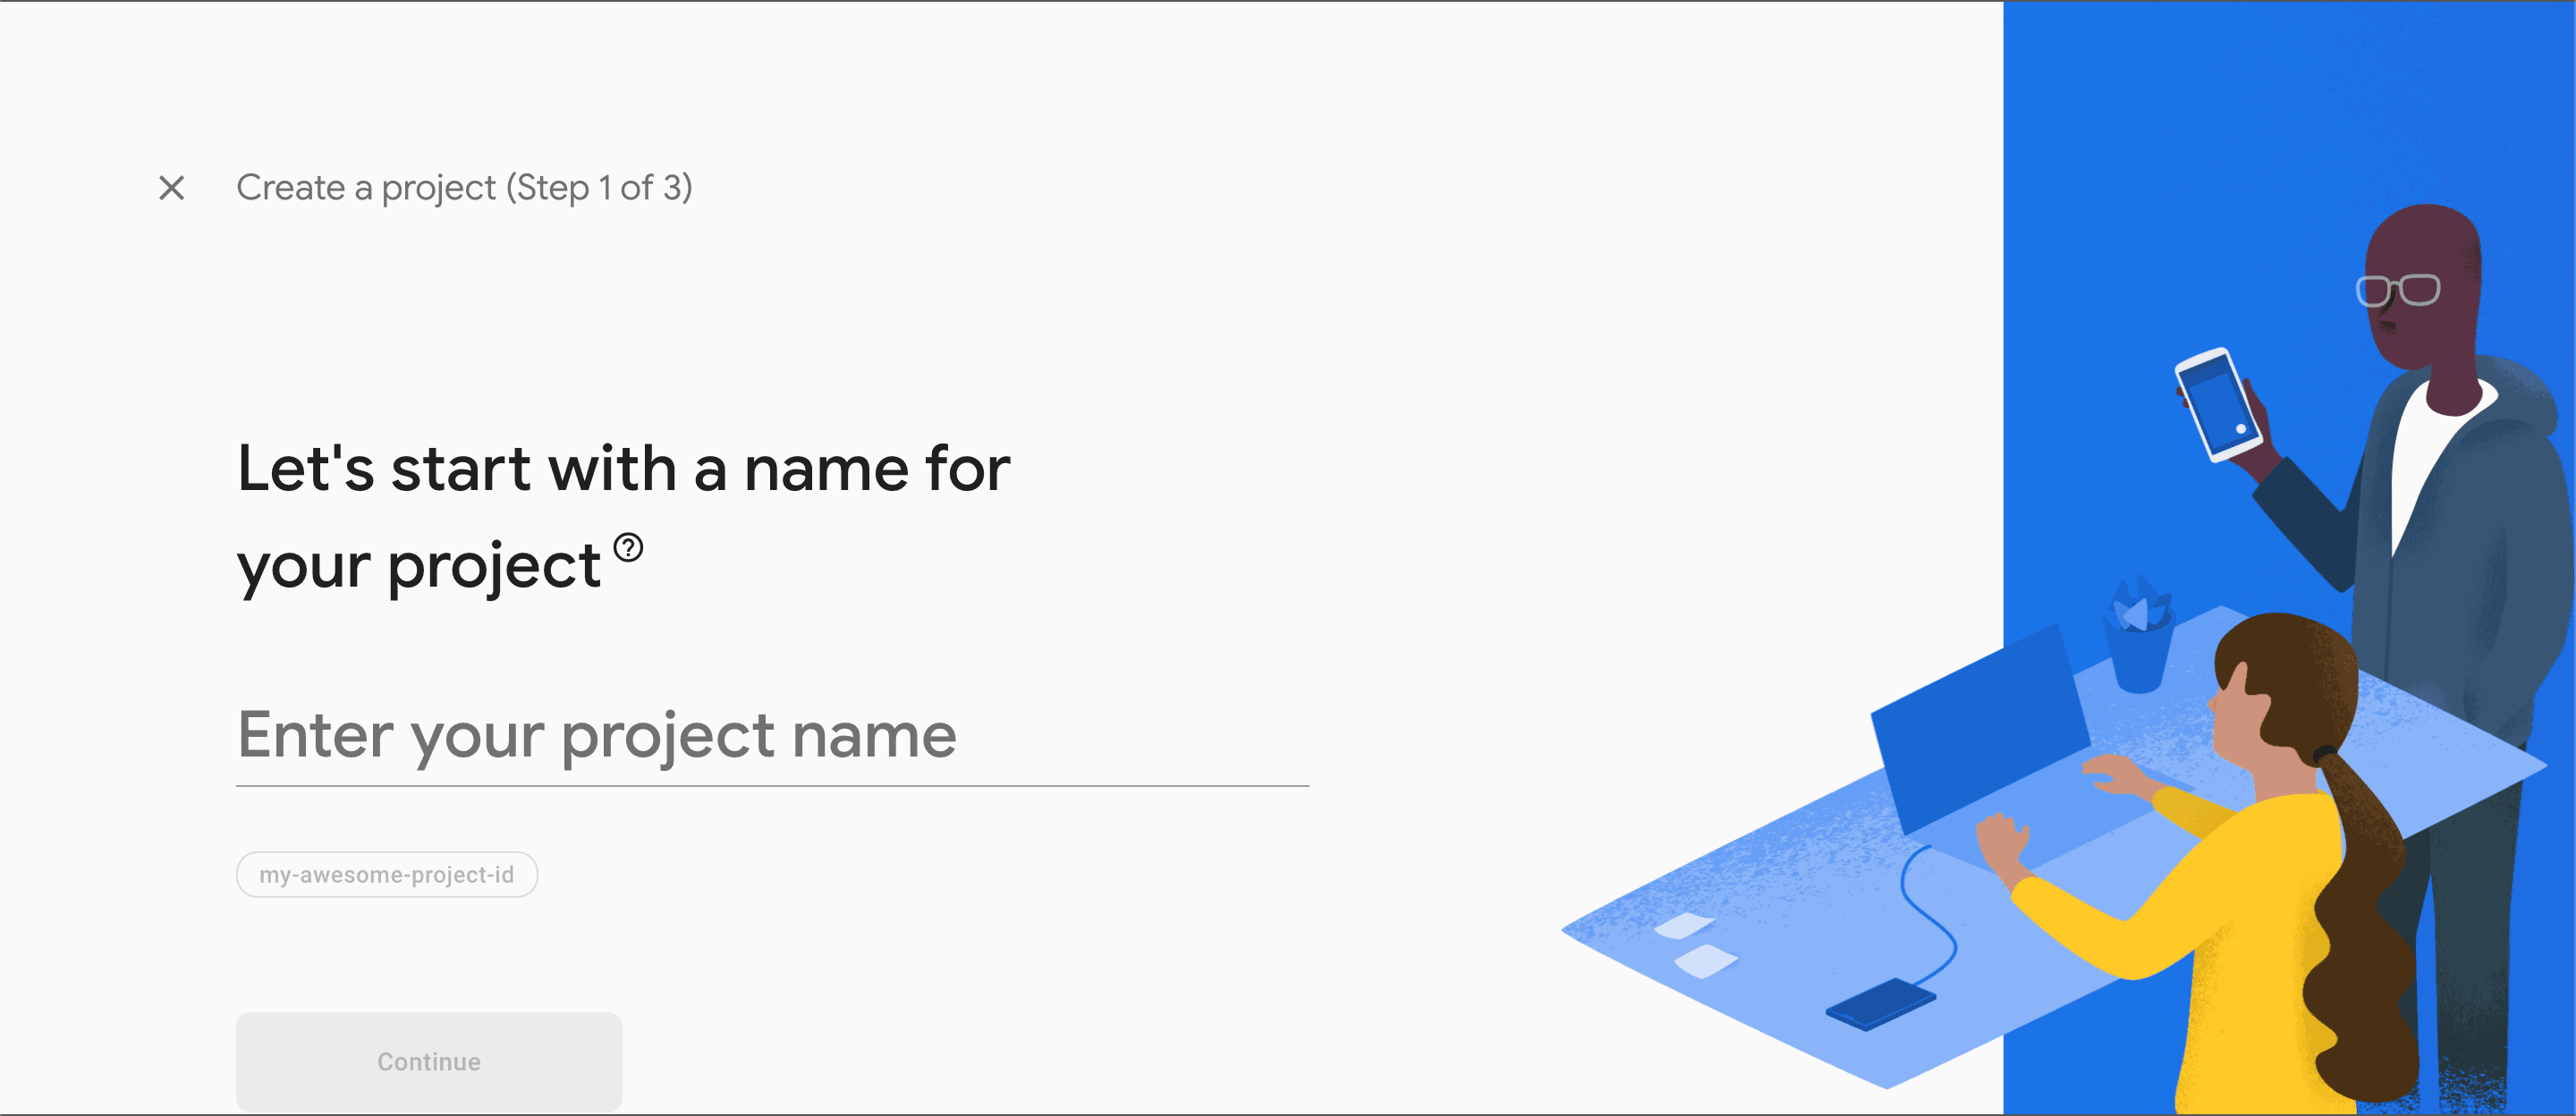
In the next step, you’ll be prompted to enter the name of your application. It can be anything you wish - we picked the name "Firebase app".
After that, you will be prompted to choose whether you want to turn on Google Analytics for this project or not.
Since this is a simple tutorial, we have decided not to turn it on. You can do the same so that we have the same "environment".
Once you have made that decision, you will see a screen that confirms that your project has been created. Once that is done, you can click "Continue".
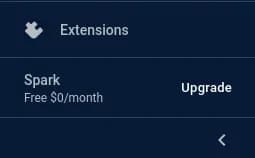
At the bottom of the left sidebar, you will see your subscription plan. If this is your first encounter with Firebase, then you will be on a free plan, currently called "Spark" at the time of writing.
For Firebase production apps, you have to have a credit card registered, and you need to upgrade to at least the lowest-tier paid plan.
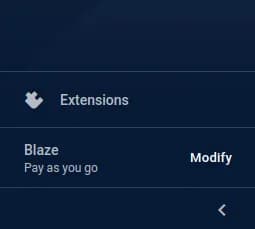
At the time of writing this article, the lowest-tier paid plan is a pay-as-you-go plan. This means you only pay for what you've spent. However, there's no need to worry about payments while developing an app (this applies to "normal" apps under "normal" circumstances). Do exercise caution when using while and for loops though (speaking from experience 😅).
Once you've switched to a different plan, you can close the Firebase console entirely and move on with this tutorial.
3. Install required dependencies
To proceed with this tutorial, you need to install the Firebase CLI tool. This is necessary because it allows you to execute Firebase CLI commands that are essential for deploying your app.
To install the Firebase CLI tool, run the following command in your terminal:
npm install -g firebase-tools
This command will install the Firebase CLI tool globally on your computer.
Once it's successfully downloaded and installed, you have to log in to Firebase via CLI to connect your Firebase Console to your machine.
To do so, you need to run the following command:
firebase login
NOTE: Make sure to use the same credentials you used to register for Firebase. Otherwise, you won't be able to access the project that you created in the second step of this tutorial.
4. Set up the Firebase project locally
Once you have finished the previous step, ensure that you are in the same directory where your project is located on your computer.
Next, you need to initialize the Firebase project locally by running the following command:
firebase init
Once you hit enter you’ll see the following screen:
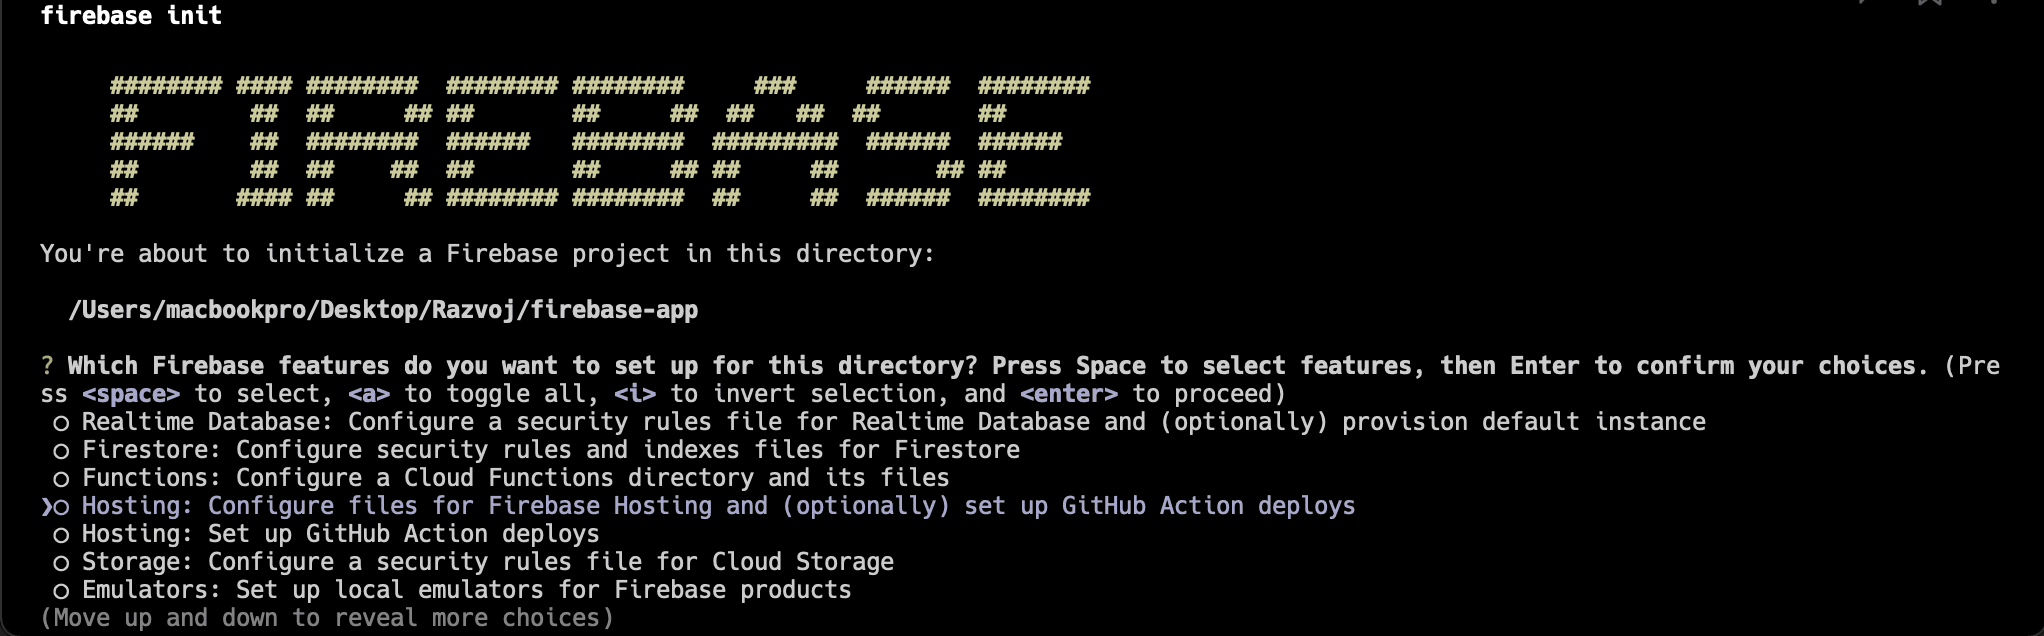
Make sure you choose the first hosting option. We will explain everything later.
Since we created our project using Firebase Console, for the next step, you need to choose 'Use an existing project', as shown in the image below.
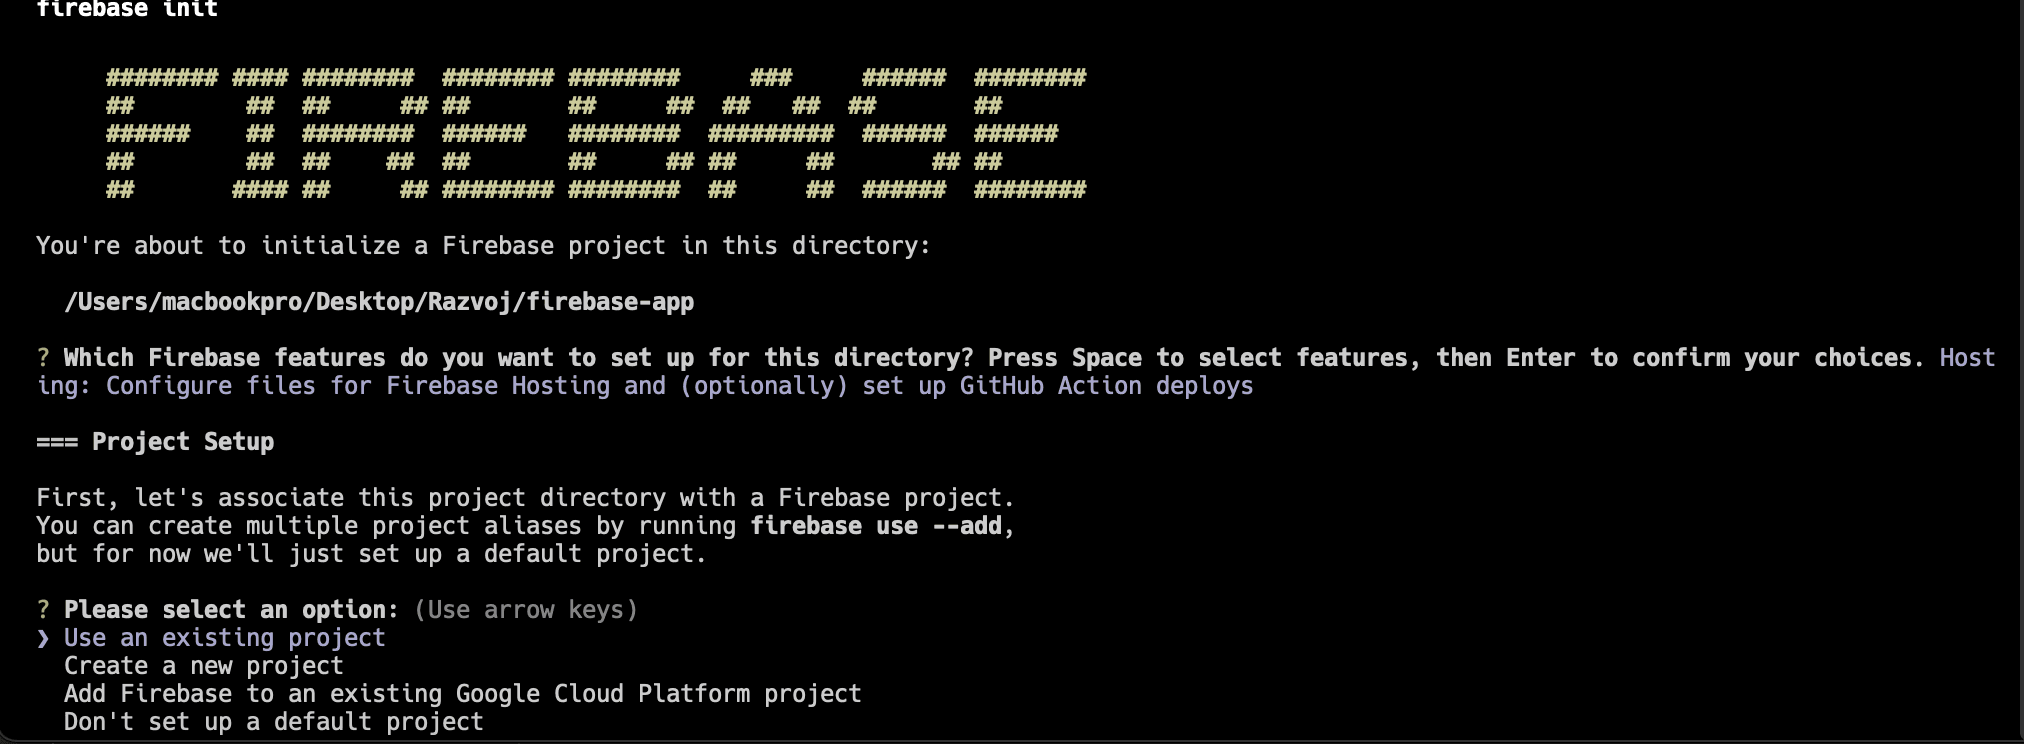
Now, select the project you created for this tutorial.
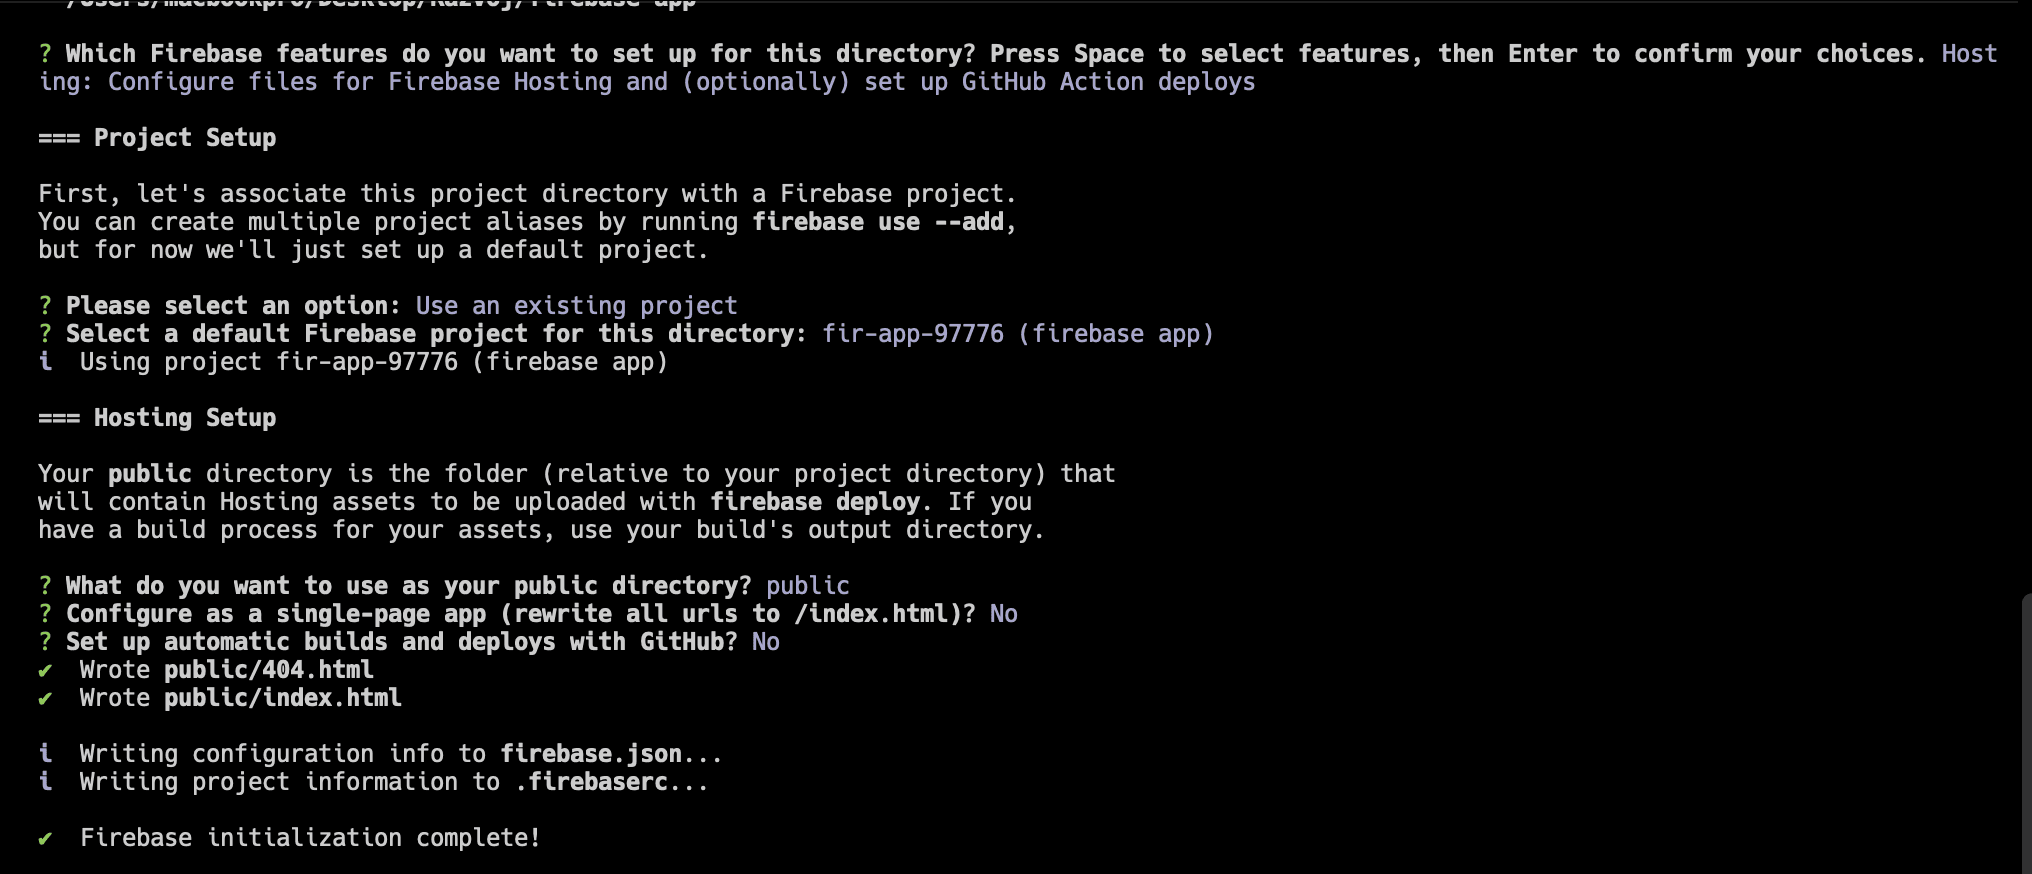
In the next step, you will be prompted with several questions such as choosing your public directory, configuring a single-page application, and so on. Once you answer those questions, your CLI configuration will be complete.
You can see what you have selected in the following image.
5. Configuration
Before we do any configuration, let's test our app on our machine by running the command:
yarn dev
If you have copied and pasted the code from our first step, you should see something like this.

Now, we’re going to cover the first option of deploying the NextJS app to Google Firebase Hosting.
Deploy static NextJS app to Firebase hosting
The first option assumes that you have a static website without any server-side rendering (SSR) or any other code with similar functionality within your application. If you're unsure about this, you can visit the official Next.js documentation on static HTML export.
The first step towards deploying your static application to Firebase hosting is to make some configuration changes in your code.
The first thing you need to do is open your next.config.js file, located in the root directory of your project, and paste the following code:
/**
 * @type {import('next').NextConfig}
 */
const nextConfig = {
 output: "export",
};

module.exports = nextConfig;
This small modification to the next.config.js file will ensure that your application is not only built but also exported to its designated folder.
Next, open the package.json file and modify the build command to the following:
"build": "next build && next export"
Once you execute this command, Next will build and export your app to the out folder at the root of your project. This out folder will be important for our next configuration step.
Create a firebase.json file in your root directory if it doesn't already exist, and paste the following code into it:
{
 "hosting": {
  "public": "out",
  "ignore": [
    "firebase.json",
    "**/.*",
    "**/node_modules/**"
  ]
 }
}
Also, paste the index.html and 404.html files from the public folder into the out folder.
In this step, we informed Firebase that the folder it needs to deploy to the public is located one step outside the previous folder, named out. Additionally, we instructed it to disregard specific types of files and folders.
The configuration process is complete. You must now construct and export the application using the straightforward command supplied by the NextJS CLI:
npm run build
We have updated the command in our package.json file from next build to next build && next export.
Once the build has been successfully executed, you can deploy your application to Firebase Hosting using the following command.
firebase deploy --only hosting
When the deployment is finished you’ll see something like this:
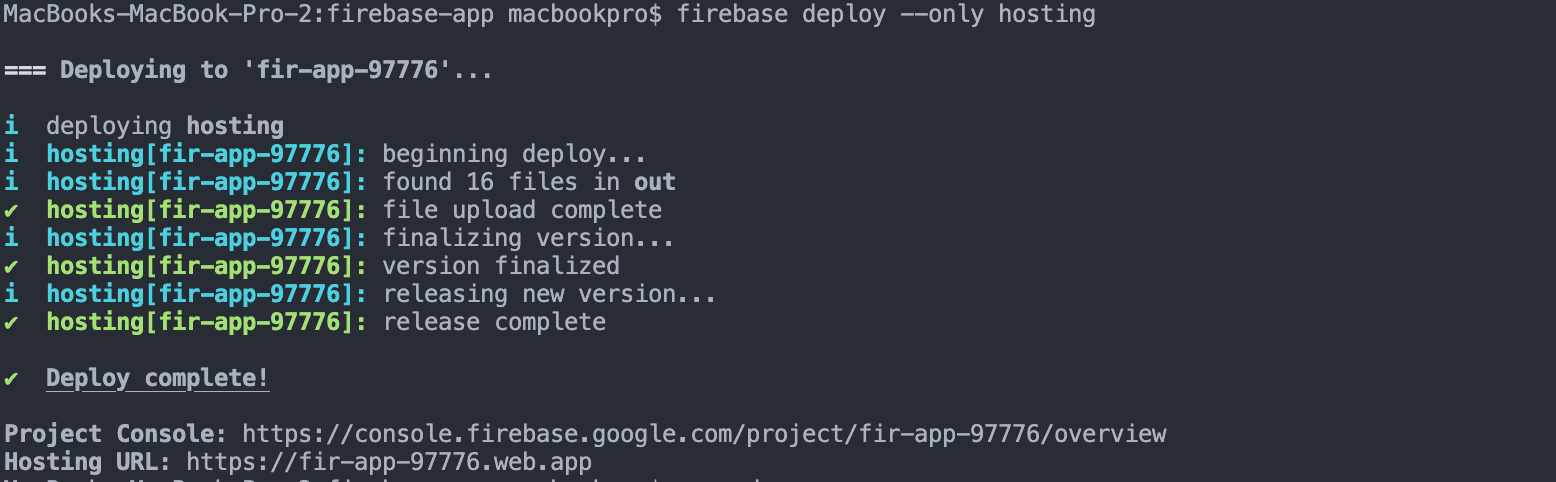
To check whether your app has been successfully deployed and is working properly, you can use the link that appears in the terminal, labeled as "Hosting URL". The URL will be different from the one shown in the image above and typically takes the form of app-name.web.app.
Deploy dynamic NextJS app to Firebase hosting
Before we deploy our dynamic Next.js app to Firebase hosting, we need to modify the code starting from our very first step.
Open the file pages/index.js and paste the following code inside it:
export default function Home(props) {
 return (
  <>
   {props.ssrWorking ? <h2>SSR working</h2> : <h2>SSR not working</h2>}
  </>
 );
}

export async function getServerSideProps() {
 return { props: { ssrWorking: true } };
}
This piece of code will check whether we have server-side rendering or not. If we have SSR, it means that our dynamic NextJS app deployment was successful; otherwise, it wasn't.
Next, we need to change firebase.json from our previous code to the following:
{
  "hosting": {
    "public": "public",
    "ignore": ["firebase.json", "**/.*", "**/node_modules/**"],
    "rewrites": [
      {
        "source": "**",
        "function": "nextServer"
      }
    ]
  },
  "functions": {
    "source": ".",
    "runtime": "nodejs16"
  }
}
You may have noticed that we have added some new functionalities here.
- If a request for files or directories via URL does not exist in the public folder, we include the rewrite rule. In this situation, we use the cloud function
nextServerto determine the response (which will be created later). - Configuration for cloud functions is included. The
"source"specifies where ournextServerfunction is located, while"runtime"specifies the Node.js runtime version that will be used to execute ournextServerfunction.
After making these changes, we need to create a function.js file to hold our nextServer function.
NOTE: The function can have any name you prefer.
Once the file is created, copy and paste the following code into it:
const { https } = require('firebase-functions');
const { default: next } = require('next');

const isDev = process.env.NODE_ENV !== 'production';

const server = next({
  dev: isDev,
  //location of .next generated after running -> yarn build
  conf: { distDir: '.next' },
});

const nextjsHandle = server.getRequestHandler();
exports.nextServer = https.onRequest((req, res) => {
  return server.prepare().then(() => nextjsHandle(req, res));
});
First, we need to check whether the program is operating in a development or production environment before passing the information to the following function.
Thereafter, we can link our custom server to our Next.js application by passing the location of the .next folder that is generated after running the npm build command to the conf option of the next function.
The request handler returned by the server.getRequestHandler function can be used to parse all HTTP requests.
The server.prepare function prepares our Next.js build code (.next) for execution on our custom server and server-side rendering.
Additionally, we need to make some changes to the package.json file. Instead of the main file being index.js, we need to change it to functions.js since we already created it. If this change is not made, an error will occur stating that index.js is missing.
 "name": "firebase-app",
 "version": "0.1.0",
 "private": true,
 "main": "function.js",
The next thing we did was to revert the build command to its original state. Additionally, we added a deploy command to the scripts.
You can copy and paste the following code:
"scripts": {
  "dev": "next dev",
  "build": "next build",
  "start": "next start",
  "lint": "next lint",
  "deploy": "yarn build && cross-env NODE_ENV=production firebase deploy --only functions,hosting"
 },
The final preparation before deploying our app is to install the following dependencies:
npm add firebase-admin firebase-functions cross-env
These are necessary for everything to function properly, as we have already utilized them in our functions.js file.
Before we deploy our app, we need to remove index.js from the public folder. Otherwise, instead of our app, we will see the default Firebase deployment page.
Next, we execute the deploy command, which builds and deploys our app simultaneously.
npm run deploy
Now, you should see this if you open the link provided by Firebase.

This means that our app is successfully deployed and working.
Now we can make any change we want and continue our deployment process.
Conclusion
Firebase Hosting and Firebase Functions, as part of Google Cloud services, are highly useful and easy to set up. You can use them for any project, especially to quickly test your code.
They scale automatically and offer a wide array of services that you can use out-of-the-box to quickly develop and deploy your NextJS app.
Firebase is highly suitable for SaaS products because it is cheap, and usually free to use until you start earning the first money from it.
We highly encourage you to take a deeper look at the documentation because it has some excellent examples.
For everything else, you can consult good old StackOverflow.
If you're trying to build a SaaS product, you can use our SaaS template that is 100% compatible with Firebase and start earning your money even faster.