- Published on
- Published:
- Reading time
- 35 min read
(Tutorial) Authorization and Authentication with Next.js and Supabase
- Authors

- Name
- Nico Botha
- @nwbotha
Authentication and authorization are important aspects of web development. But they can be difficult to understand, especially if you're not an experienced web developer.
In this beginner-friendly article, we'll cover how to implement Next.js auth using Supabase for authorization and authentication by using a template from the official Next.js documentation.
For this tutorial, we’re going to create a home page of a blog with a list of articles. But to read those articles you have to be registered and logged in.
Let’s get into it.
Setting Up Authorization and Authentication
To get started, you'll first need to install Next.js and set up Supabase.
Install Next.js
The easiest way to start with Next.js is to run the command npx create-next-app in the directory where you want your project stored. You don't even need to create an empty directory, as this command will do that for you. (To learn more about create-next-app, you can check out this page).
After you run this command, you'll see a prompt, and you just need to answer the questions. Once you finish, you'll need to wait a bit for the packages to install. Meanwhile, you can go to Supabase to start a project.
Register for Supabase and create a project
First, go to the Supabase website, and sign up. Upon registration, go to your Supabase dashboard.
Then, click "New Project" and fill out the name of the database and password. Also, make sure you pick the Free tier, as this is what you need to get started with any project.
Once you've created your project, you’ll be redirected to a page where your API keys and the project URL are listed.
Create a .env file in the root directory of the project if it isn't already present.
In the .env file add your Supabase URL and Supabase anon key:
NEXT_PUBLIC_SUPABASE_URL=YOUR_SUPABASE_URL
NEXT_PUBLIC_SUPABASE_ANON_KEY=YOUR_SUPABASE_ANON_KEY
Your anon key and project URL can be found in the Settings of your project, under the API tab, in case you missed them.
Example of Supabase URL:
https://qgfyxxerhhdffipgfauqjnha.supabase.co
Example of Supabase anon key:
eyJhbGciOiJIUzI1NiIsInR5cCI6IkpXVCJ9.eyJpc3MiOiJzdXBhYmFzZSIsInJlZiI6InFnZn12344dmppbGpwzxcZ2dXFqbmhhIiwicm9sZSI6IakIjsfljrwCJpYXQiOjE2NzU1NDM3MjUsImV4cCI6MTk5MTExOTcyNX0.k5bp-tCDIZuDPbDOKQKpd0CdTcG-CABKXD00Mturt0Y
Install dependencies
The next step is to install the required dependencies for your Next.js app to successfully communicate with Supabase.
Open the root of your app’s directory in the terminal and run this command:
npm install @supabase/supabase-js
supabase-js is an isomorphic JavaScript client for Supabase. This means that it can be used both on the client side and on the server side.
Authentication
Now that we’ve prepared our project, let’s start with the authentication process.
There are several different ways offered by Supabase to authenticate users:
- Email & password
- Magic links (this is password-less one-click login)
- Social media providers (GitHub, Google, Twitter, Facebook)
- Phone logins
For this tutorial, we’re going to use email and password authentication because it’s still the most popular way of authenticating users.
The process is pretty similar for any of the above authentication types.
You can find the code HERE to see what the end product looks like.
NOTE: Don’t forget to update the values in the .env file with your project's values.
Layouts
For our project, we need to have two different layouts.
An unrestricted layout for pages index.js, login.js, logout.js, signup.js, and a restricted layout for our blog posts (so people can’t access them without being logged in).
Unrestricted layout
Let’s start with the unrestricted one. In your root directory create a components directory and inside create layout.js.
In layout.js paste the following code:
import Head from "next/head"
import Image from "next/image"
import Link from "next/link"
import styles from "../styles/layout.module.css"
import utilStyles from "../styles/utils.module.css"

const name = "Blog of John Doe"
export const siteTitle = "Authorization with Next.js"

export default function Layout({ children, home }) {
 return (
  <div className={styles.container}>
   <Head>
    <link rel="icon" href="/favicon.ico" />
    <meta
     name="description"
     content="Learn authorization and authentication with Next.js and Supabase"
    />
    <meta
     property="og:image"
     content={`https://og-image.vercel.app/${encodeURI(
      siteTitle
     )}.png?theme=light&md=0&fontSize=75px&images=https%3A%2F%2Fassets.vercel.com%2Fimage%2Fupload%2Ffront%2Fassets%2Fdesign%2Fnextjs-black-logo.svg`}
    />
    <meta name="og:title" content={siteTitle} />
    <meta name="twitter:card" content="summary_large_image" />
   </Head>

   <header className={styles.header}>
    {home ? (
     <>
      <Image
       priority
       src="/images/profile.jpeg"
       className={utilStyles.borderCircle}
       height={144}
       width={144}
       alt=""
      />
      <h1 className={utilStyles.heading2Xl}>{name}</h1>
     </>
    ) : (
     <>
      <Link href="/">
       <Image
        priority
        src="/images/profile.jpeg"
        className={utilStyles.borderCircle}
        height={108}
        width={108}
        alt=""
       />
      </Link>
      <h2 className={utilStyles.headingLg}>
       <Link href="/" className={utilStyles.colorInherit}>
        {name}
       </Link>
      </h2>
     </>
    )}
   </header>

   <main>{children}</main>

   {!home && (
    <div className={styles.backToHome}>
     <Link href="/">← Back to home</Link>
    </div>
   )}
  </div>
 )
}
Let’s analyze this a bit.
After we import everything we need for our component, we create a component that accepts two parameters: children and home.
The first parameter is child elements that will be wrapped by this component, and home is a boolean value that indicates whether the current route is the home page of our application. This will be used in two places - in our <header /> element and at the end of the layout component.
In the <header /> element, we’ll use it to render either a link to the home page along with an image or just plain text with an image, depending on whether the route is home or not.
At the end of the component, we’ll use the home boolean value to render either a link to the home page or a div with a custom class.
{home ? (
     <>
      <Image
       priority
       src="/images/profile.jpeg"
       className={utilStyles.borderCircle}
       height={144}
       width={144}
       alt=""
      />
      <h1 className={utilStyles.heading2Xl}>{name}</h1>
     </>
    ) : (
     <>
      <Link href="/">
       <Image
        priority
        src="/images/profile.jpeg"
        className={utilStyles.borderCircle}
        height={108}
        width={108}
        alt=""
       />
      </Link>
      <h2 className={utilStyles.headingLg}>
       <Link href="/" className={utilStyles.colorInherit}>
        {name}
       </Link>
      </h2>
     </>
    )}
This part of the code will run if the current route is not "home", and it will display a "Back to Home" link.
{!home && (
 <div className={styles.backToHome}>
  <Link href="/">← Back to home</Link>
 </div>
)}
Between these two snippets, we have one line of code that will render the children of this component.
<main>{children}</main>
Home page
Now that we have the layout sorted, open the pages/index.js file and paste the following code (replacing all of the existing code).
import Head from "next/head"
import Link from "next/link"
import Layout, { siteTitle } from "../components/layout"
import utilStyles from "../styles/utils.module.css"

const allPostsData = [
 {
  id: "ssg-ssr",
  title: "When to use static generation vs server-side rendering",
  date: "2023-01-01",
 },
 {
  id: "pre-rendering",
  title: "Two forms of pre-rendering",
  date: "2023-01-01",
 },
]

export default function Home() {
 return (
  <Layout home>
   <Head>
    <title>{siteTitle}</title>
   </Head>
   <section className={utilStyles.headingMd}>
    <p>
     <Link href='/login'>Log in</Link> to read these blog posts
    </p>
   </section>

   <section className={`${utilStyles.headingMd} ${utilStyles.padding1px}`}>
    <h2 className={utilStyles.headingLg}>Blog</h2>
    <ul className={utilStyles.list}>
     {allPostsData.map(({ id, date, title }) => (
      <li className={utilStyles.listItem} key={id}>
       <Link href={`/posts/${id}`}>{title}</Link>
       <br />
       {id}
       <br />
       {date}
      </li>
     ))}
    </ul>
   </section>
  </Layout>
 )
}
After importing everything we need for this component to run properly, we initiate the component and create a variable called allPostsData, which is an array of posts.
const allPostsData = [
 {
  id: "ssg-ssr",
  title: "When to use static generation vs server-side rendering",
  date: "2023-01-01",
 },
 {
  id: "pre-rendering",
  title: "Two forms of pre-rendering",
  date: "2023-01-01",
 },
]
These two articles are rendered further down in the code, as shown below:
{allPostsData.map(({ id, date, title }) => (
 <li className={utilStyles.listItem} key={id}>
  <Link href={`/posts/${id}`}>{title}</Link>
  <br />
  {id}
  <br />
  {date}
 </li>
))}
As you can see, we have imported our Layout at the top of this page. Now, we’ll use it as a wrapper for everything on our home page.
<Layout home>
  // The rest of the code
</Layout>
As you can see, we used the home parameter to indicate to our Layout component that this is the home page route. This is the only place where we will use it.
This should be the result:
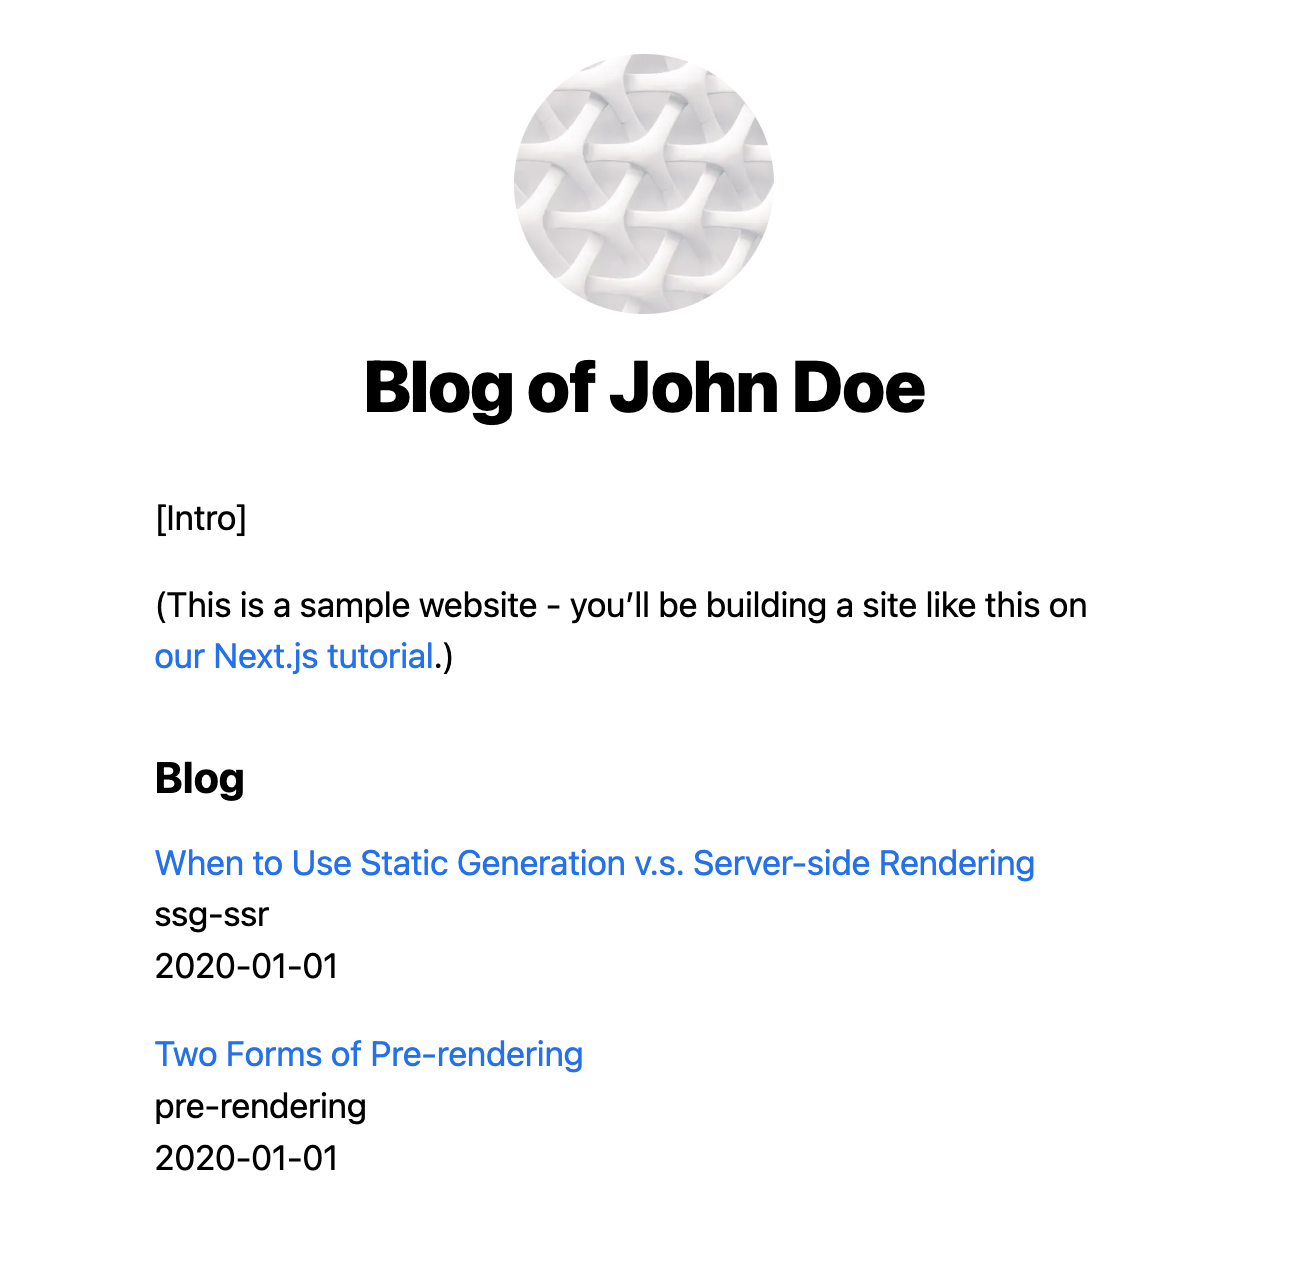
Note: Run the npm run dev command in the root directory of your project and open http://localhost:3000 in your browser to see the result.
Signup
Now that we’ve finished our home page, we need to add a way for our users to register.
Let's create a signup page.
import React, { useState } from "react"
import Head from "next/head"
import utilStyles from "../styles/utils.module.css"
import Layout, { siteTitle } from "../components/layout"
import { supabase } from '../utils/supabase'

export default function SignupPage() {
 const [email, setEmail] = useState("")
 const [password, setPassword] = useState("")
 const [error, setError] = useState(null)
 const [success, setSuccess] = useState(false)

 const handleSignup = async (event) => {
  event.preventDefault()
  try {
   const { data, error } = await supabase.auth.signUp({
    email,
    password,
   })
   if (error) {
    setError(error.message)
   } else {
    setSuccess(true)
   }
  } catch (error) {
   setError(error.message)
  }
 }

 return (
  <Layout>
   <Head>
    <title>{siteTitle}</title>
   </Head>
   <div>
    <h1 className={utilStyles.headingMd}>Signup</h1>
    {error && <p style={{ color: "red" }}>{error}</p>}
    {success && (
     <p style={{ color: "green" }}>
      A magic link has been sent to your email!
     </p>
    )}
    <form onSubmit={handleSignup} className={utilStyles.flexCol}>
     <input
      type="email"
      placeholder="Email"
      value={email}
      onChange={(event) => setEmail(event.target.value)}
      className={utilStyles.input}
      required
     />

     <input
      type="password"
      placeholder="Password"
      value={password}
      onChange={(event) => setPassword(event.target.value)}
      className={utilStyles.input}
      required
     />
     <button type="submit" className={utilStyles.button}>
      Signup
     </button>
    </form>
   </div>
  </Layout>
 )
}
Now, finally, we’re using the @supabase/supabase-js package.
This will help us communicate with the Supabase server and services.
For your Next.js app to be able to communicate with Supabase, you need to create a new Supabase client using your Supabase credentials from the beginning of this tutorial.
If you’ve saved them in your .env file, you can use them as we did:
const supabase = createClient(
 process.env.NEXT_PUBLIC_SUPABASE_URL,
 process.env.NEXT_PUBLIC_SUPABASE_ANON_KEY
)
IMPORTANT: If you want your .env variables to be accessible by the browser, you have to start the name with NEXT_PUBLIC_.
After creating the Supabase client, we initiate 4 variables for the state.
emailto keep email valuepasswordto keep password valueerrorto keep an error so we can render an alert in our UI for our usersuccessso we can populate our UI with a success message and notify our users of a verification email
In this code snippet, we render eventual error and success messages:
{error && <p style={{ color: "red" }}>{error}</p>}
{success && (
 <p style={{ color: "green" }}>
  A magic link has been sent to your email!
 </p>
)}
Next, we have a simple form with only two fields: email and password.
Upon submission of the form, we run the handleSignup function.
const handleSignup = async (event) => {
  event.preventDefault()
  try {
   const { data, error } = await supabase.auth.signUp({
    email,
    password,
   })
   if (error) {
    setError(error.message)
   } else {
    setSuccess(true)
   }
  } catch (error) {
   setError(error.message)
  }
 }
To allow users to sign up we use the supabase.auth.signUp() method.
If you need to pass more than just email and password, which is usually the case, you can do it like this:
const { data, error } = await supabase
 .auth
 .signUp({
    email: 'example@email.com',
    password: 'example-password',
    options: {
      data: {
        first_name: 'John',
        age: 27,
      }
    }
  })
You can also specify where you want your users to be redirected after they confirm their email address using the following snippet:
const { data, error } = await supabase
 .auth
 .signUp({
    email: 'example@email.com',
    password: 'example-password',
    options: {
      emailRedirectTo: '<https://example.com/welcome>' // <-- this is the redirect URL
    }
  })
If you want to learn more about the signUp method options, you can do so here.
We expect either data or error as a response, and we use object destructuring to extract those.
In the case of an error value, we show the actual error message in our UI, otherwise, we show a success message.
This is what your signup page should look like at this stage:
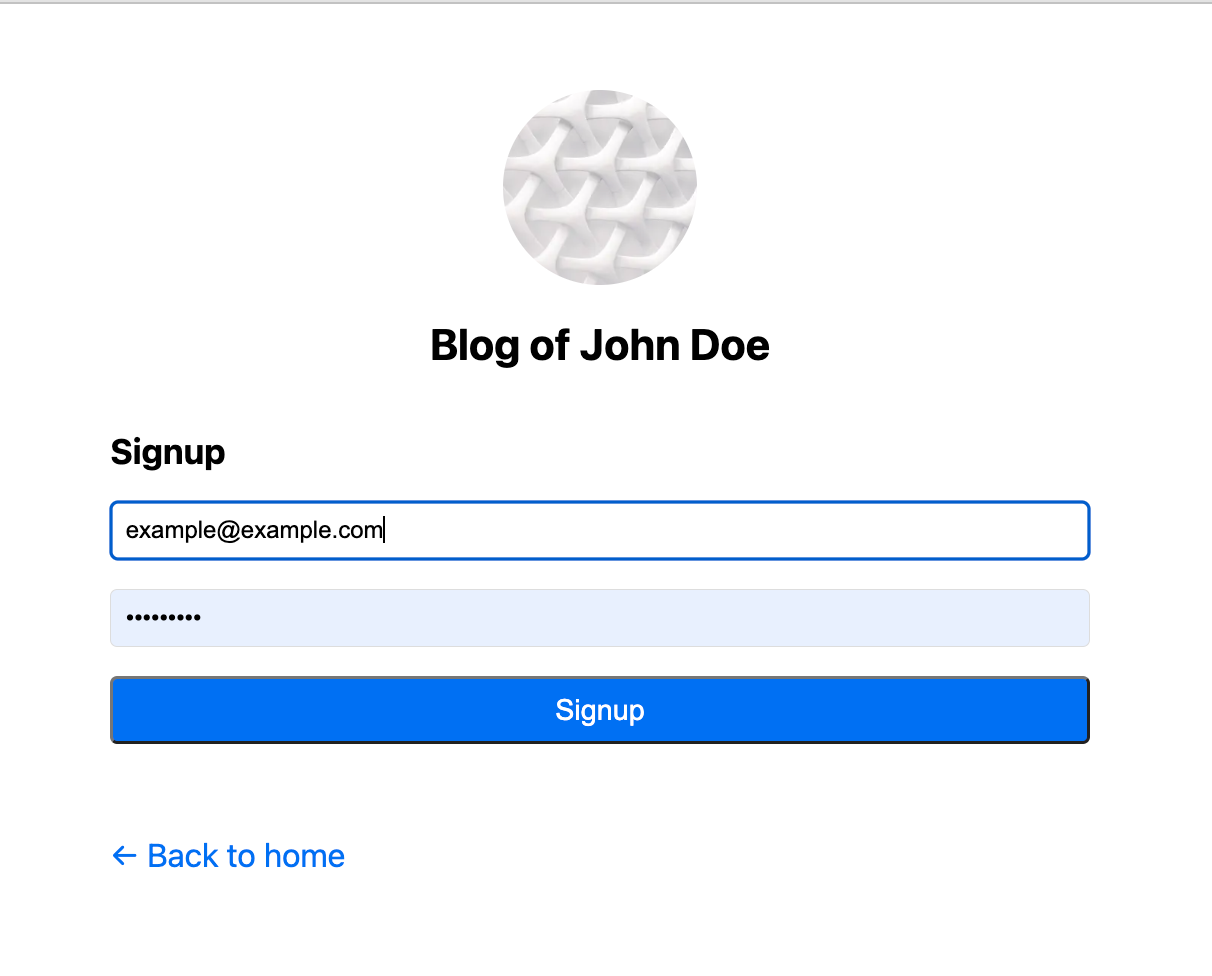
Note: Run the npm run dev command in the root directory of your project and open http://localhost:3000 in your browser to see the result.
Login
After our users successfully sign up and confirm their email, they’ll be able to log into our app.
Now, let’s create a page where they can do that.
In the pages directory, create a login.js file and paste the following code:
import React, { useState } from "react"
import Head from "next/head"
import { useRouter } from "next/router"
import Layout, { siteTitle } from "../components/layout"
import utilStyles from "../styles/utils.module.css"
import { supabase } from '../utils/supabase'

export default function Login() {
 const router = useRouter()
 const [error, setError] = useState(null)
 const [email, setEmail] = useState("")
 const [password, setPassword] = useState("")
 const handleLogin = async (event) => {
  event.preventDefault()

  try {
   const { data, error } = await supabase.auth.signInWithPassword({
    email,
    password,
   })
   if (error) {
    setError(data.message)
   } else {
    console.log(data)
    localStorage.setItem("user", JSON.stringify(data))
    router.push("/")
   }
  } catch (error) {
   setError(error.message)
  }
 }
 return (
  <Layout>
   <Head>
    <title>{siteTitle}</title>
   </Head>
   <div>
    <h1 className={utilStyles.headingMd}>Login</h1>
    {error && <p style={{ color: "red" }}>{error}</p>}
    <form onSubmit={handleLogin} className={utilStyles.flexCol}>
     <input
      type="email"
      placeholder="Email"
      value={email}
      onChange={(event) => setEmail(event.target.value)}
      className={utilStyles.input}
      required
     />
     <input
      type="password"
      placeholder="Password"
      value={password}
      onChange={(event) => setPassword(event.target.value)}
      className={utilStyles.input}
      required
     />
     <button type="submit" className={utilStyles.button}>
      Login
     </button>
    </form>
   </div>
  </Layout>
 )
}
This code snippet is almost the same as signup.js, but instead of registering users, we allow them to log in.
For that, we use the handleLogin function that runs when the form is submitted.
const handleLogin = async (event) => {
  event.preventDefault()

  try {
   const { data, error } = await supabase.auth.signInWithPassword({
    email,
    password,
   })
   if (error) {
    setError(data.message)
   } else {
    console.log(data)
    localStorage.setItem("user", JSON.stringify(data))
    router.push("/")
   }
  } catch (error) {
   setError(error.message)
  }
 }
As you can see from the code snippet above, we’re using the signInWithPassword() method. This checks the username and password on Supabase, and if the credentials are correct it will return the session and user information.
If everything is successful, Supabase will create an entry in the browser localStorage that will be used later for authorization.
It will be stored with a key similar to this example: sb-qgfyxvjiljpgfvuqjnha-auth-token.
In our example, we stored data in localStorage with the key user, so if we need some info for later usage, it’s easily accessible.
You could remove localStorage.setItem("user", JSON.stringify(data)); if you don’t need it, and everything would still work for authorization and authentication.
Your login page should look like this:
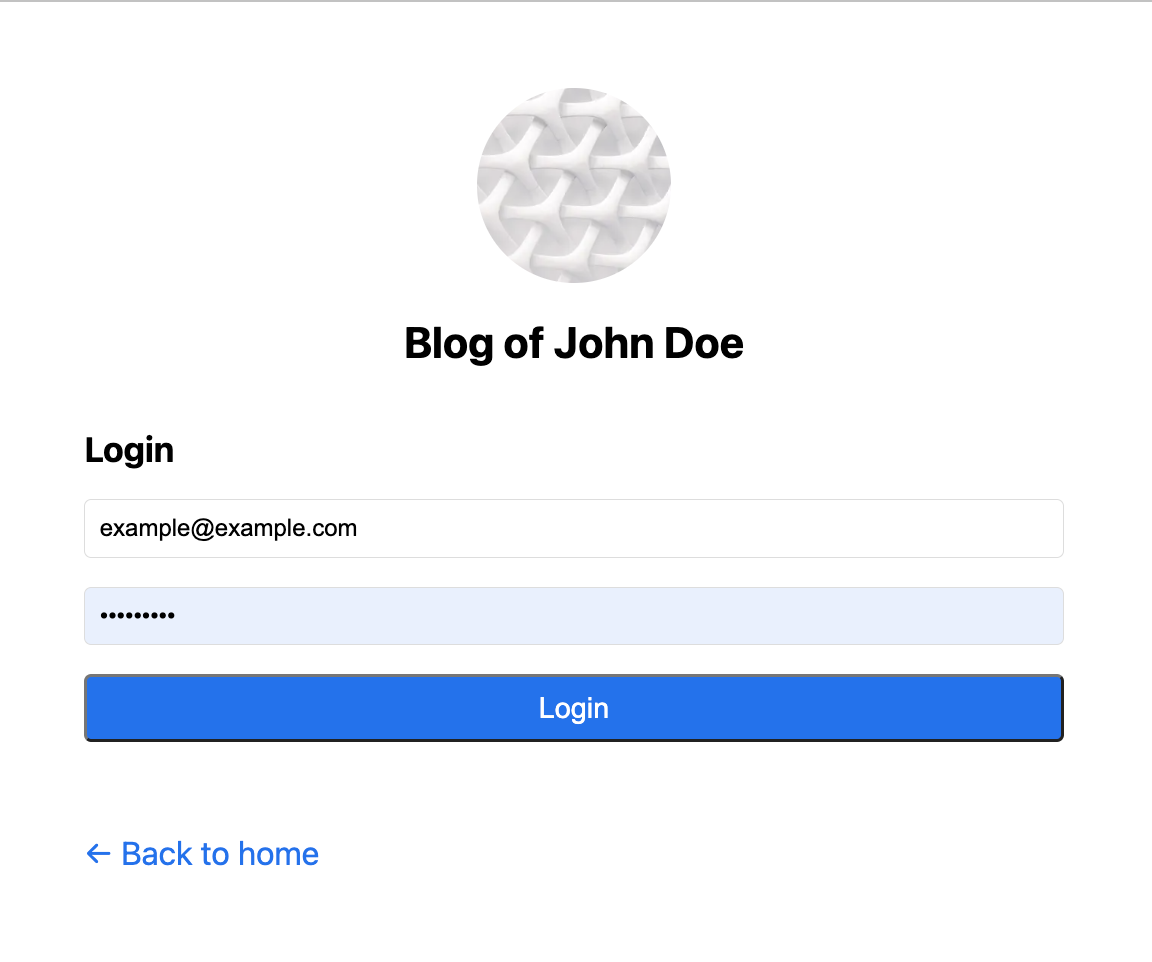
Note: Run the npm run dev command in the root directory of your project and open http://localhost:3000 in your browser to see the result.
Logout
We need to complete the circle with the logout page.
Open the pages directory and create a logout.js file inside. Then, paste the following code:
import { useEffect } from "react"
import { useRouter } from "next/router"

export default function Logout() {
 const router = useRouter()
 useEffect(() => {
  localStorage.clear()
  router.push("/")
 }, [])
}
We use the useEffect hook so that it’s rendered client-side. This is important because localStorage is not accessible server-side.
Since Supabase saves the session data in localStorage, the user is logged out when deleting the data from the localStorage.
Note: Once you log in you can visit http://localhost:3000/logout and your session will be destroyed.
Restricted layout
Now that we’ve created the entire user registration flow, let’s create the restricted layout - the layout we’ll be using for posts.
Before it shows an article it’ll check whether the user is logged in. If the user is logged in, they’ll be able to read the article. Otherwise, they’ll be redirected to the home page.
Open the components directory and create a new file called protectedLayout.js. You can name this file whatever you want. But, if you downloaded the code provided, you’ll see this name.
In that file, paste the following code:
import React, { useState, useEffect } from "react"
import Head from "next/head"
import Image from "next/image"
import Link from "next/link"
import { useRouter } from "next/router"
import styles from "../styles/layout.module.css"
import utilStyles from "../styles/utils.module.css"
import { supabase } from '../utils/supabase'

const name = "Blog of John Doe"
const siteTitle = "Authorization with Next.js"

export default function ProtectedLayout({ children }) {
 const router = useRouter()
 const [user, setUser] = useState(null)

 useEffect(() => {
  const verifyUser = async () => {
   try {
    const { data, error } = await supabase.auth.getSession()
    if (error) {
     router.push("/logout")
    } else {
     if (!data.session) {
      router.push("/login")
     }

     setUser(data)
     localStorage.setItem("user", JSON.stringify(data))
    }
   } catch (error) {
    router.push("/logout")
   }
  }

  verifyUser()
 }, [])

 if (user) {
  return (
   <div className={styles.container}>
    <Head>
     <link rel="icon" href="/favicon.ico" />
     <meta
      name="description"
      content="Learn authorization and authentication with Next.js and Supabase"
     />
     <meta
      property="og:image"
      content={`https://og-image.vercel.app/${encodeURI(
       siteTitle
      )}.png?theme=light&md=0&fontSize=75px&images=https%3A%2F%2Fassets.vercel.com%2Fimage%2Fupload%2Ffront%2Fassets%2Fdesign%2Fnextjs-black-logo.svg`}
     />
     <meta name="og:title" content={siteTitle} />
     <meta name="twitter:card" content="summary_large_image" />
    </Head>

    <header className={styles.header}>
     <>
      <Link href="/">
       <Image
        priority
        src="/images/profile.jpeg"
        className={utilStyles.borderCircle}
        height={108}
        width={108}
        alt=""
       />
      </Link>
      <h2 className={utilStyles.headingLg}>
       <Link href="/" className={utilStyles.colorInherit}>
        {name}
       </Link>
      </h2>
      <Link href="/logout">Logout</Link>
     </>
    </header>

    <main>{children}</main>

    <div className={styles.backToHome}>
     <Link href="/">← Back to home</Link>
    </div>
   </div>
  )
 }
}
Most of the code you will have already seen in the previous snippets (the DRY principle just went down the drain). We’ll focus our attention on the main functionality of this layout.
The main functionality is to verify users every time they open an article. Let’s inspect the verifyUser() function more closely.
useEffect(() => {
  const verifyUser = async () => {
   try {
    const { data, error } = await supabase.auth.getSession()
    if (error) {
     router.push("/logout")
    } else {
     if (!data.session) {
      router.push("/login")
     }

     setUser(data)
     localStorage.setItem("user", JSON.stringify(data))
    }
   } catch (error) {
    router.push("/logout")
   }
  }

  verifyUser()
 }, [])
We’re using the useEffect() hook, so this function is run every time the state changes. It uses the getSession() method to verify with Supabase that a user is authorized to read the article.
If an error is encountered, we redirect the user to the logout.js page to delete the session (if it existed), just to make sure.
If data is returned, but the session object is empty for any reason, we redirect users to the login.js page so they can refresh their session.
Otherwise, we save the freshly received data object in localStorage. Again, this is only convenient if we need some of this data. If we don’t need any of the user data, it’s completely redundant.
Posts
Our website is complete. Now we just need to add some posts. Create a directory named posts within the pages directory and add 2 files: pre-rendering.js and ssg-ssr.js.
Add the following code in pre-rendering.js:
import Head from "next/head"
import ProtectedLayout from "../../components/protectedLayout"

export default function SecondPost() {
 return (
  <ProtectedLayout>
   <Head>
    <title>Second post</title>
   </Head>
   <h1>Second post</h1>
   {/* Generate 2 paragraphs of lorem ipsum text */}
   <p>
    "Lorem ipsum dolor sit amet, consectetur adipiscing elit, sed do
    eiusmod tempor incididunt ut labore et dolore magna aliqua. Ut
    enim ad minim veniam, quis nostrud exercitation ullamco laboris
    nisi ut aliquip ex ea commodo consequat. Duis aute irure dolor
    in reprehenderit in voluptate velit esse cillum dolore eu fugiat
    nulla pariatur. Excepteur sint occaecat cupidatat non proident,
    sunt in culpa qui officia deserunt mollit anim id est laborum."
   </p>
   <p>
    "Sed ut perspiciatis unde omnis iste natus error sit voluptatem
    accusantium doloremque laudantium, totam rem aperiam, eaque ipsa
    quae ab illo inventore veritatis et quasi architecto beatae
    vitae dicta sunt explicabo. Nemo enim ipsam voluptatem quia
    voluptas sit aspernatur aut odit aut fugit, sed quia
    consequuntur magni dolores eos qui ratione voluptatem sequi
    nesciunt. Neque porro quisquam est, qui dolorem ipsum quia dolor
    sit amet, consectetur, adipisci velit, sed quia non numquam eius
    modi tempora incidunt ut labore et dolore magnam aliquam quaerat
    voluptatem. Ut enim ad minima veniam, quis nostrum
    exercitationem ullam corporis suscipit laboriosam, nisi ut
    aliquid ex ea commodi consequatur? Quis autem vel eum iure
    reprehenderit qui in ea voluptate velit esse quam nihil
    molestiae consequatur, vel illum qui dolorem eum fugiat quo
    voluptas nulla pariatur?"
   </p>
  </ProtectedLayout>
 )
}
You’ll notice that instead of using the <Layout/> wrapper, we’ve used <ProtectedLayout />.
Everything else is just regular HTML.
Now for ssg-ssr.js, you can add the following code:
import Head from "next/head"
import ProtectedLayout from "../../components/protectedLayout"

export default function FirstPost() {
 return (
  <ProtectedLayout>
   <Head>
    <title>First Post</title>
   </Head>
   <h1>First Post</h1>
   {/* Generate 2 paragraphs of lorem ipsum text */}
   <p>
    "Lorem ipsum dolor sit amet, consectetur adipiscing elit, sed do
    eiusmod tempor incididunt ut labore et dolore magna aliqua. Ut
    enim ad minim veniam, quis nostrud exercitation ullamco laboris
    nisi ut aliquip ex ea commodo consequat. Duis aute irure dolor
    in reprehenderit in voluptate velit esse cillum dolore eu fugiat
    nulla pariatur. Excepteur sint occaecat cupidatat non proident,
    sunt in culpa qui officia deserunt mollit anim id est laborum."
   </p>
   <p>
    "Sed ut perspiciatis unde omnis iste natus error sit voluptatem
    accusantium doloremque laudantium, totam rem aperiam, eaque ipsa
    quae ab illo inventore veritatis et quasi architecto beatae
    vitae dicta sunt explicabo. Nemo enim ipsam voluptatem quia
    voluptas sit aspernatur aut odit aut fugit, sed quia
    consequuntur magni dolores eos qui ratione voluptatem sequi
    nesciunt. Neque porro quisquam est, qui dolorem ipsum quia dolor
    sit amet, consectetur, adipisci velit, sed quia non numquam eius
    modi tempora incidunt ut labore et dolore magnam aliquam quaerat
    voluptatem. Ut enim ad minima veniam, quis nostrum
    exercitationem ullam corporis suscipit laboriosam, nisi ut
    aliquid ex ea commodi consequatur? Quis autem vel eum iure
    reprehenderit qui in ea voluptate velit esse quam nihil
    molestiae consequatur, vel illum qui dolorem eum fugiat quo
    voluptas nulla pariatur?"
   </p>
  </ProtectedLayout>
 )
}
NOTE: The name of the files in the posts directory has to correspond to the id property of the allPostsData array of objects in your index.js file.
Next steps
This is just the beginning of authentication and authorization using Next.js and Supabase.
Supabase offers a wide range of out-of-the-box solutions for more advanced authentication and authorization flows. You can find more info about it in their documentation here.
They’re also offering more granular authorization. One of their best and most secure features in this area is RLS (Row Level Security). You can read more about RLS here.
Don’t feel like reading and learning tons of new stuff? You can get everything you need with our SaaS template.
Features include not only authentication but also storage, internationalization, billing & subscription, database integration, and much more. You can check out all the features here.
Final words
This is a really simple tutorial. It’s meant for beginners because most tutorials on this topic are for more advanced users. The code is intentionally written in a simplistic manner allowing as many readers to understand everything without much effort.
Check out the GitHub repository for this tutorial here.
Since September 2022 and Next.js v13, there have been some substantial changes to Next.js. Keep an eye out for our more advanced tutorial on this topic integrated with Next.js v13.
Visit Ship SaaS for more information.